Data Versioning for CD4ML – Part 2
(This post is the second of a two-part series where I will be touching on a component of CD4ML: data versioning, and how it can be incorporated into an end-to-end CI/CD workflow. This second part brings one through a deeper and more technical dive into the topic, to give the audience a better understanding of how the tool can be applied concerning the different aspects of a workflow while the first one presents high-level overviews of the topic, ending off with the introduction of DVC.)
Table of Contents
- Preface
- Prerequisites & Tools: The required services & tools to get our hands dirty.
- Problem Statement & Overview of Workflows: What are we working towards and why bother?
- Practical Section 1 – Beginning Continuous Integration: Automating CI workflows through GitHub Actions.
- Practical Section 2 – Automated Testing & Versioning with DVC: Testing code on GitHub Actions and using DVC beyond versioning of data.
- Practical Section 3 – Reviewing Model Experiments: Track model experiments with DVC and review through GitHub.
- Practical Section 4 (Optional) – Packaging & Serving: Packaging the trained models, for serving.
- Next Steps: Where to go from here.
Preface
In the previous post, we have touched on the deliberations that one can make when it comes to versioning data as well as an introduction of DVC. For this post, we will be exploring more of DVC’s functions while diving deeper into some aspects of CD4ML, particularly data & pipeline versioning, and continuous integration. With that said, this whole post will be much more technical than the first one. Naturally, we will be using different tools along the way which will help us in facilitating the intended workflows.
IMPORTANT NOTE: While this post does its best to be as beginner-friendly as possible, it does assume some basic technical proficiency of the reader.
Prerequisites & Tools
This section covers the tools, service accounts and basic knowledge required for us to follow through the post.
Some tools are to be installed on our local machine and a few accounts are needed for services required for the facilitation of some workflows. Even though we will be training a deep learning model later on, the local machine to be used need not be with a GPU, but they need to have decent computing power.
We will be leveraging on a versioning control system and the choice for this walkthrough is Git. If we went through the whole of Part 1, Git would have been installed as DVC by default leverages on Git for versioning of its metafiles. This post/walkthrough also assumes that one is comfortable with the basics of Git. Otherwise, the basics can be picked up through resources like this or this.
GitHub is a platform for hosting source code to be versioned; it will be used for several purposes in this walkthrough:
– as a remote for the code repository that we will be creating
– GitHub Actions for automating some of the workflows that will be introduced along the way
Do create an account if you have yet to do so.

As we work towards garnering a working predictive model, we will be using an experiment tracking tool and that’s where Weights & Biases comes in. One can create a free account, download the relevant CLI/library and get started right away with access to a dashboard. Once signed up, do take note of the W&B API key for your account under ‘Settings’.
- DVC (CLI and Remote Storage)
CLI
Of course, we will be having DVC in the spotlight as indicated by the name of the post. Installation of DVC in your local machine is required. This post assumes the installation of the tool through the following methods as opposed through pip or conda:
– Installation for MacOS
– Installation for Windows
– Installation for Linux
One can still install the tool through pip or conda but do note that the YAML file for creating our development environment later will not include it and you would have to install it yourself.
Remote Storage for DVC
In this walkthrough, artefacts and cache created locally are to be pushed to a remote storage and we will be accessing them across differing machines or different directories within the same machine. You are to set up your own remote storage and have the credentials for access on standby. While the walkthrough uses Azure Blob storage as an example, one can use any remote storage that’s desired, as long as DVC supports it. Below are some suggestions for which you can get started with:
If you have not signed up for an Azure account before, you can get complimentary $200 credit which means that you can gain instant access to a multitude of Azure services. You would still need a credit card on sign up but this walkthrough would not incur much cost, if at all. We highly recommend resorting to this service as it is one of the easiest to get started with. This link will walk you through on how to set up a container for your blobs after which you can obtain the connection string from the ‘Access keys’ tab on your Azure portal.

If you do not have access to a credit card, this is the next best alternative as all you would need is just a Google account and you are automatically provided with 15GB of storage. However, this method is the most time consuming as using Google Drive as a remote storage for DVC would present you with a suboptimal experience i.e. you will incur more time in following through as DVC pushes and pulls would be much slower. DVC’s documentation has a comprehensive walkthrough on how to get your Google Drive all set up as a remote storage.
- Docker and Docker Hub account
Through GitHub Actions, we will be automating builds of a container (Docker) image as well as running workflows using this containerised environment. Docker installation on your local machine is optional however it would be a more wholistic experience if you can try out building images on your own local machine. A Docker Hub account is required to store our Docker images online; we will be pushing and pulling images from our account’s Docker image repositories.
If you are unfamiliar with Docker, you can refer to the following resources on the basics:
– What is a Container?: https://www.docker.com/resources/what-container
– Docker for Beginners: https://docker-curriculum.com/
– Docker Simplified – A Hands-On Guide for Absolute Beginners: https://www.freecodecamp.org/news/docker-simplified-96639a35ff36/
If you have worked with Python’s virtual environments before, Anaconda is just an alternative for which you would have access to Anaconda packages/libraries instead of just those from PyPI. For those who have never delved into virtual environments before, you should. For those finding Anaconda to be hefty with the footprint it leaves, you can resort to installing the lightweight alternative Miniconda instead. We will be using conda environments for this walkthrough.
Problem Statement & Overview of Workflows
Before we dive right into the tools and workflows, let us be presented with a problem statement that would be deemed relevant for the topic of the day. This would give us some direction as we explore the differing concepts.
What is the problem?
Good question. Well, let’s say we are tasked with developing a deep learning model that is able to conduct binary classification of sentiments from inferred texts. If you have accumulated plenty of experience building such models, you would know that this is not too hard of a task to get started on (performance of model aside). Here’s an example of a tutorial that basically lets you do that (in fact the code for the model training aspect later is derived from this tutorial). However, when we are taking into consideration an environment for which we would have to work with other individuals, sticking to development workflows which are contained mostly within Jupyter or Colab notebooks might not translate well into collaborative relationships. Deliberating on this begets several things which might include the following:
- Modularisation
The utility of Jupyter notebooks are certainly not to be dismissed; they allow for quick experimentation and iterations. However, functions or control structures written within notebooks would be made much more useful if they were modularised, encapsulated within a proper project structure. Reasons for this includes how cumbersome it can be to version control notebooks as well as how it can easily introduce bad habits to programming newbies. It does has its merits (lower barrier of entry for experimentations, persisted outputs, cool plugins) but one should be wary of dead code and how mess can easily accumulate within such environments.
- Continuous Integration (CI)
In a project with many moving parts that are worked on by different people, a workflow with seamless feedback loops and automated testing is important. There should not be plain assumptions that any code or refactoring works to be committed and merged into the ma repository would work as expected or that they follow good conventions. For example, how can we ensure that the functions written for text processing would still work the same should we change the regex expressions being used? Unit and integration testing are mechanisms we can utilise for automatic provision of feedback. We will also take a look into automating the builds of the development environment needed for running these tests and checks.
- Versioning
Versioning of source code is a relatively straightforward matter. It’s hard to say the same with data and model artefacts. As mentioned in the first part of this series, we cannot use Git for versioning our dataset and model files so that’s where DVC and remote storages come in. However, beyond just versioning file artefacts, there lies great utility with versioning of the pipelines that have these artefacts as dependencies or outputs.
In summary, we will be churning out binary sentiment classification models with the usage of modularised pipelines for which the dependencies and outputs will be tracked. Some workflows will be automated through a CI tool.
Outline of Workflows
- Beginning Continuous Integration
– Repository Set Up
– Create a GitHub Action Workflow
– Populating GitHub Secrets
– Automating a Container (Docker) Build
– Triggering a Workflow Manually - Automated Testing & Versioning with DVC
– DVC with Remote Storage
– Adding & Versioning Raw Data
– DVC Pipelines
– Adding & Automating Unit Tests - Reviewing Model Experiments
– Experiment Tracking
– Reviewing Model Experiments Through Comments
– Reproducing The Model Training Pipeline - Packaging & Serving
– Practical Section 1 –
Beginning Continuous Integration
Hereon, we will be getting our hands dirty so get ready with all the needed accounts/keys/tools (read: ‘Prerequisites & Tools’).
Repository Set Up
We will begin by creating a new repository on our GitHub account and then cloning it to our local machine.
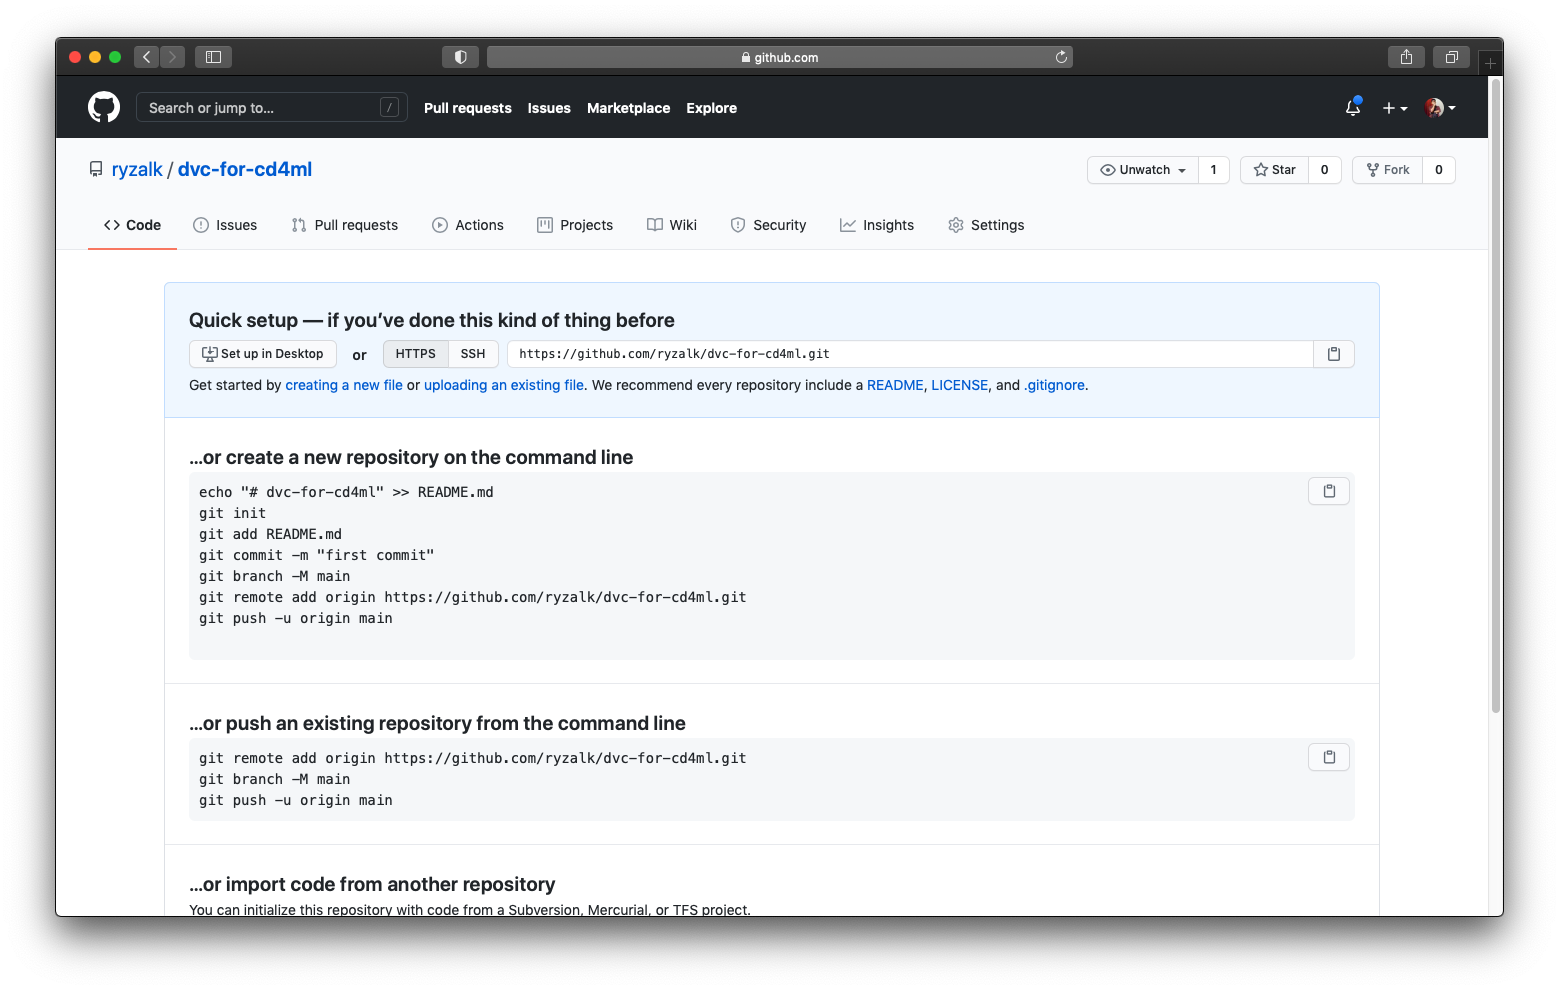
In the example above, the repository is named dvc-for-cd4ml so it will be referenced as such from hereon. Again, let’s clone the repository to our local machine:
$ git clone https://github.com//dvc-for-cd4ml.git
$ cd dvc-for-cd4ml
IMPORTANT NOTE: If you have set up 2FA for your GitHub account, you have to use either a personal access token or SSH key instead of your password when accessing GitHub through your terminal. Please refer to the linked resources on how to create a personal access token or connecting to GitHub with SSH.
GitHub Actions
Viewing your repository on GitHub, you would notice a tab called ‘Actions’:

So what is GitHub Actions? If you have used other CI/CD tools like Jenkins, Travis CI or Circle CI, GitHub Actions is basically GitHub’s alternative offering, with very minimal set up – you have access to it from the get go, free for use for the most part especially if your project is open sourced. If you have never used CI/CD tools before, you can automatically execute workflows following certain actions like pushes to a Git repository or manual triggers. With such capabilities, you can seamlessly test, conduct automated checks, integrate and even deploy your code. While the initial learning curve might seem daunting, the payoff can be huge (or not, depending on execution) and hopefully its benefits would be more observable once you have gone through this technical walkthrough. With that said, let’s go ahead with creating our first GitHub Action workflow.
Additional Reference(s):
– GitHub Actions’ Documentation: https://docs.github.com/en/free-pro-team@latest/actions
– https://martinfowler.com/articles/continuousIntegration.html
Creating a GitHub Action Workflow
Now, copy the files linked below into the repository within their own prefixed subdirectories. (If a file is prefixed with .github/workflows/, make sure that the directory .github/workflows/ exists beforehand.)
- .github/workflows/build-environment.yaml
- .github/workflows/retag-docker-image.yaml
- scripts/check-file-matches.sh
You can either manually create the files, copy-pasting the contents from the links above or…..you can run the following commands (using curl) to instantly create the files:
# NOTE: Run these commands from the repository's root location
$ curl https://raw.githubusercontent.com/ryzalk/dvc-for-cd4ml/master/.github/workflows/build-environment.yaml --create-dirs -o .github/workflows/build-environment.yaml
$ curl https://raw.githubusercontent.com/ryzalk/dvc-for-cd4ml/master/.github/workflows/retag-docker-image.yaml --create-dirs -o .github/workflows/retag-docker-image.yaml
$ curl https://raw.githubusercontent.com/ryzalk/dvc-for-cd4ml/master/scripts/check-file-matches.sh --create-dirs -o scripts/check-file-matches.sh
Now, add (track) and commit the files:
$ git add .github scripts
$ git commit -m "First commit; add GA workflows and script for building environment."
$ git push origin master
After pushing the files, you would observe that the ‘Actions’ tab is updated with a couple of workflows ('Change Latest Docker Image' and 'Build Environment'):

IMPORTANT NOTE: Understanding the basic overview, concepts and terminologies of GitHub Actions would be advantageous before we do a deep dive into the workflows below.
Let’s go through each of the files we have pushed:
- .github/workflows/build-environment.yaml
Click here for a detailed rundown of the file.
- scripts/check-file-matches.sh
Click here for a detailed rundown of the file.
- .github/workflows/retag-docker-image.yaml
Click here for a detailed rundown of the file.
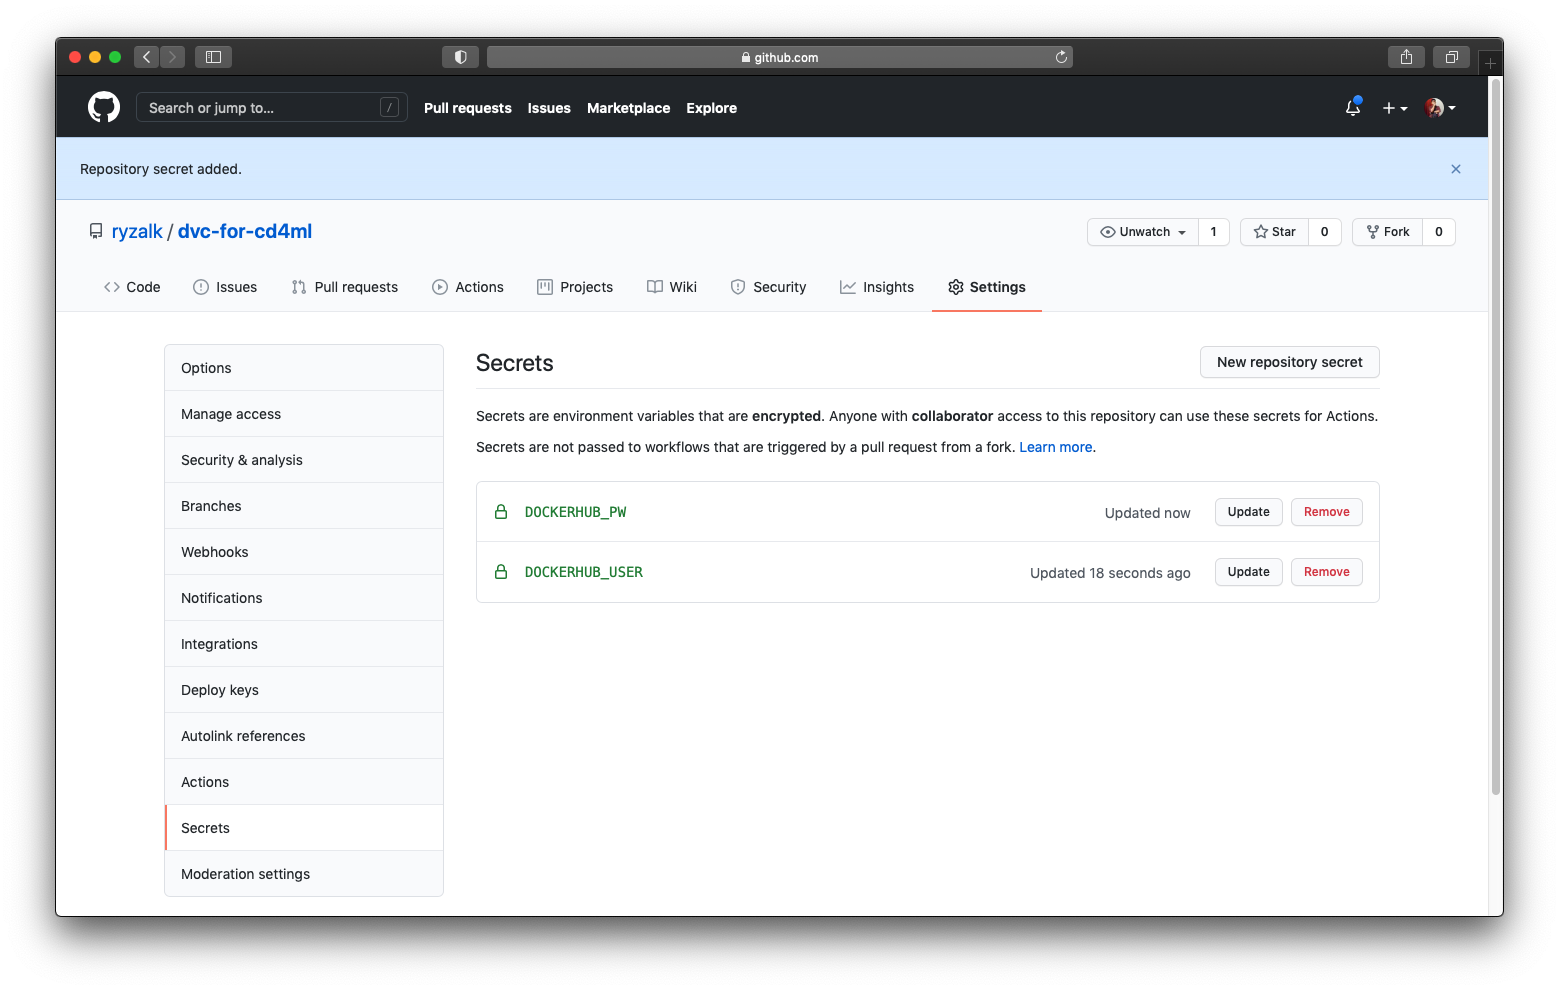
Populating GitHub Secrets
In the workflows shared above, before being able to push the Docker builds we would have to log in to our Docker Hub account first, using credentials to be stored on GitHub in an encrypted manner. We are to store our Docker Hub username and password on the GitHub repository under the ‘Settings’ tab right by the sidebar ‘Secrets’ (reference link). The credentials to be stored are to be named as such:
DOCKERHUB_USER: Docker Hub account username.DOCKERHUB_PW: Docker Hub password.
Automating a Container (Docker) Build
Now that we have the first set of credentials configured, let us work towards executing the workflows above. Before we add the Dockerfile and Conda environment YAML file to the repository, let us create a new branch (build-env) which would eventually be merged into the master branch through a pull request. We then push this newly created branch to the remote.
$ git checkout -b build-env
$ git push -u origin build-env
Create the files linked below, add, commit, and then push to remote:
$ curl https://raw.githubusercontent.com/ryzalk/dvc-for-cd4ml/master/docker/dvc-for-cd4ml.Dockerfile --create-dirs -o docker/dvc-for-cd4ml.Dockerfile
$ curl https://raw.githubusercontent.com/ryzalk/dvc-for-cd4ml/master/dvc-for-cd4ml-conda.yaml --create-dirs -o dvc-for-cd4ml-conda.yaml
$ git add docker dvc-for-cd4ml-conda.yaml
$ git commit -m "Add Dockerfile and Conda YAML file for building the custom dev environment."
$ git push origin build-env
Let’s go through each of the files we have pushed:
- docker/dvc-for-cd4ml.Dockerfile
Click here for a detailed rundown of the file.
- dvc-for-cd4ml-conda.yaml
Click here for a detailed rundown of the file.
After the push above, your GitHub ‘Actions’ tab would look something like this (if you see an orange circle icon, wait for a few minutes):
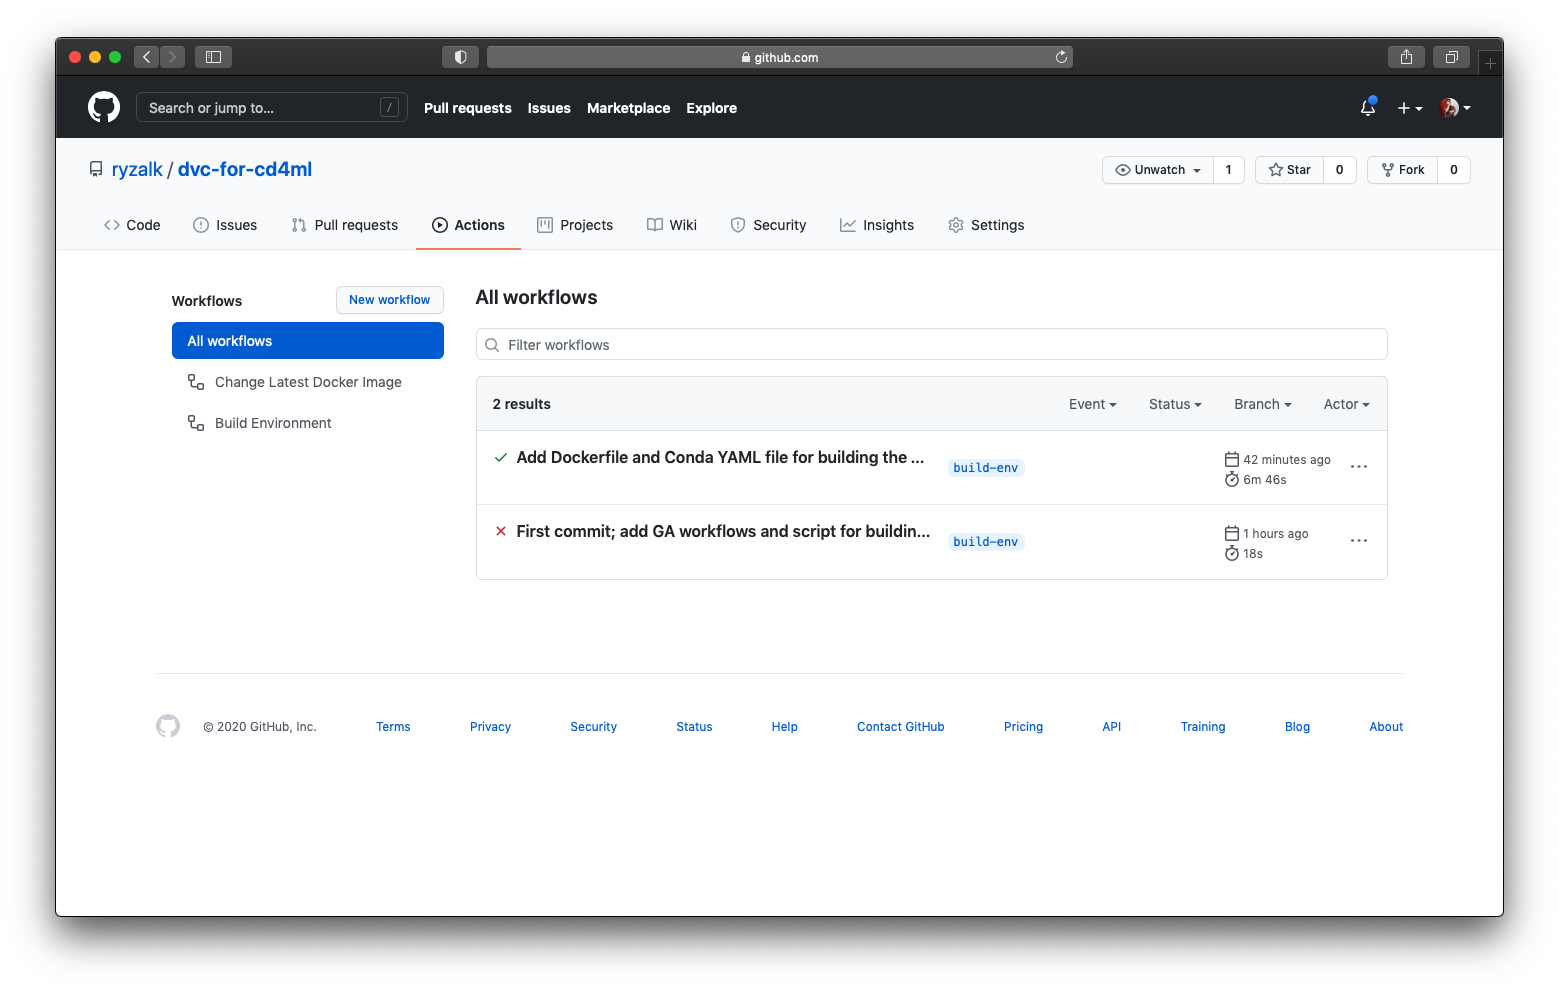
build-env.You can inspect the workflow run corresponding to the latest commit message above and you would see that all the steps defined in .github/workflows/build-environment.yaml have been executed (as indicated by the circled check icons).
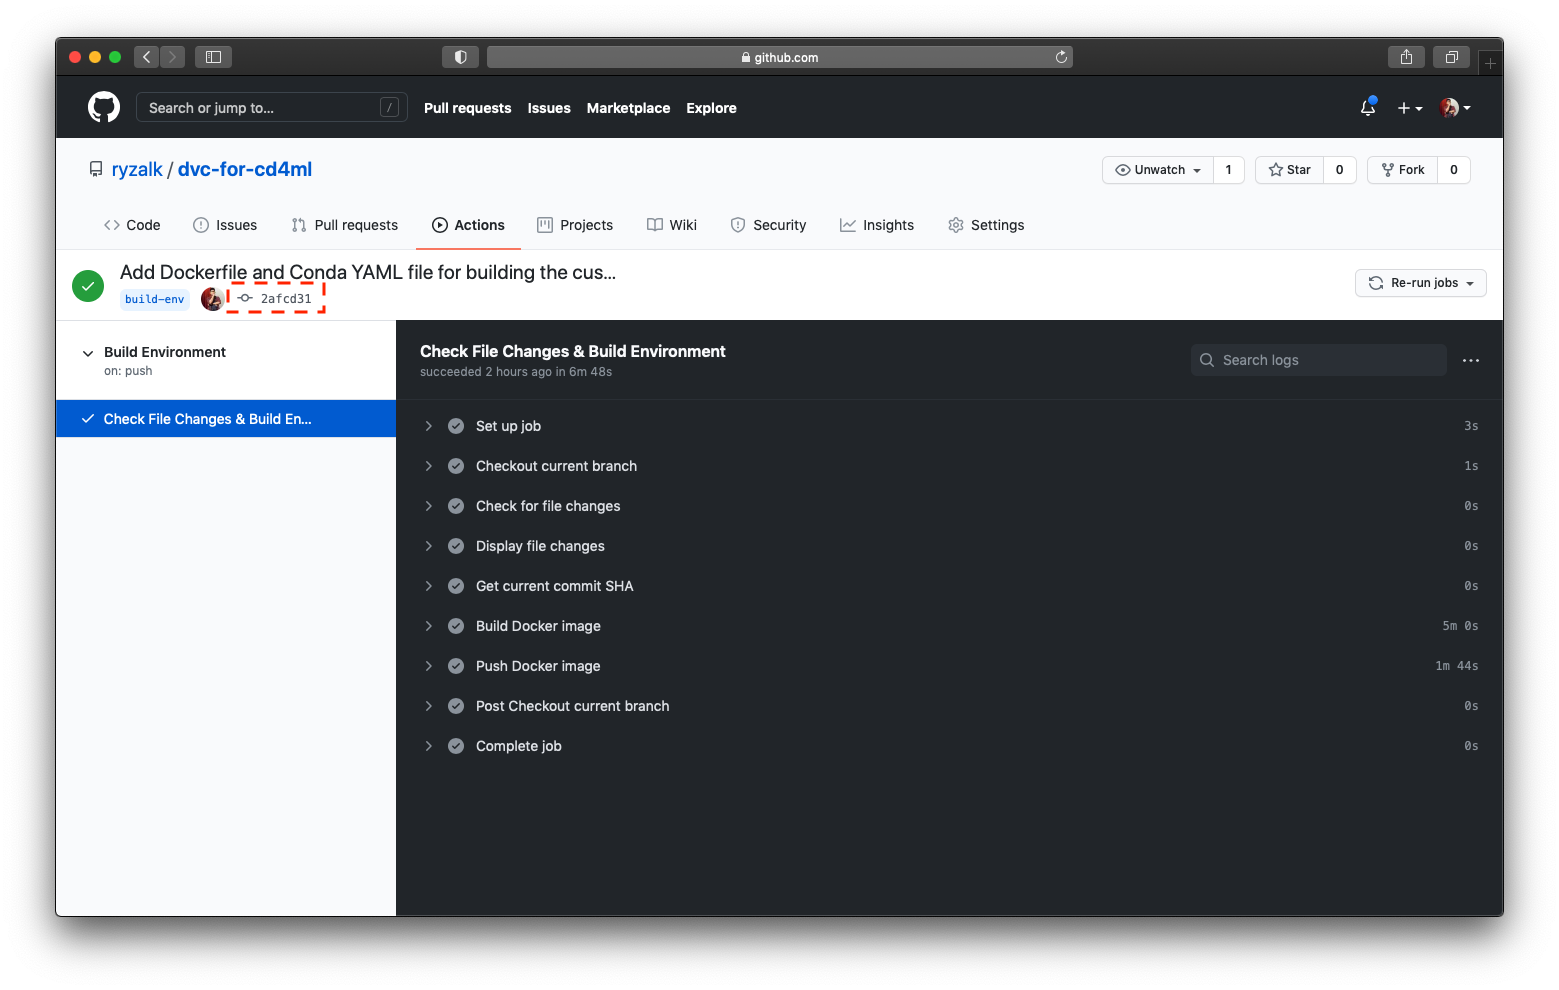
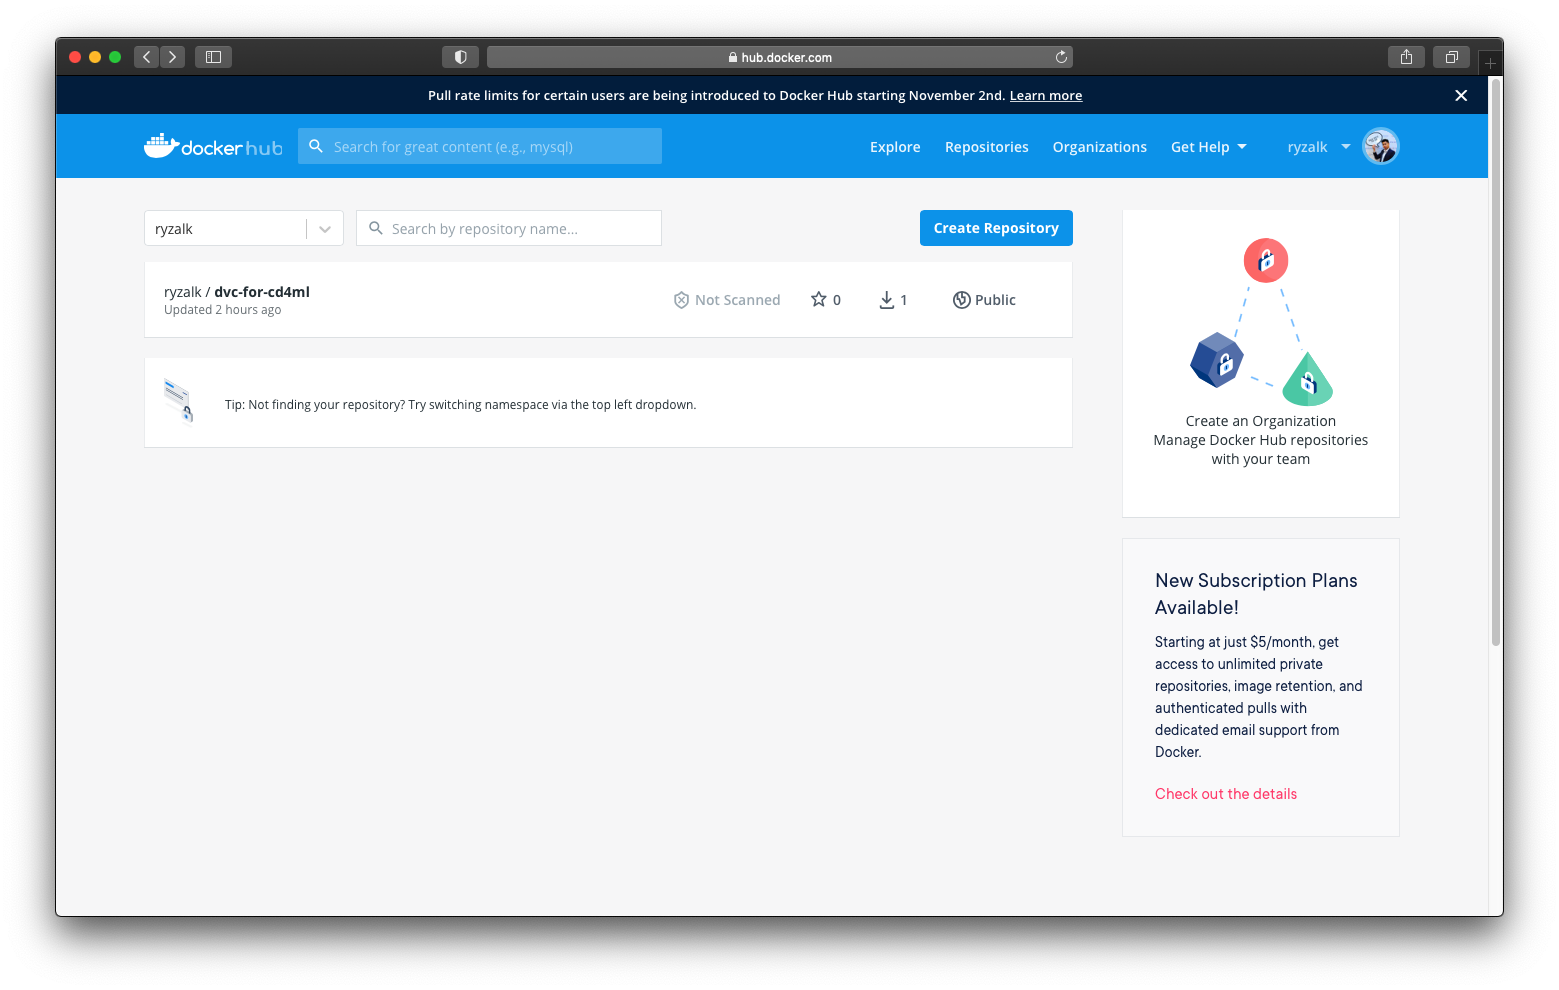
Build Environment workflow.The relevant commit SHA for this workflow run is indicated by a dotted box in the image above. If you were to inspect the ‘dvc-for-cd4ml’ repository in your Docker Hub account, you would see something like the following:
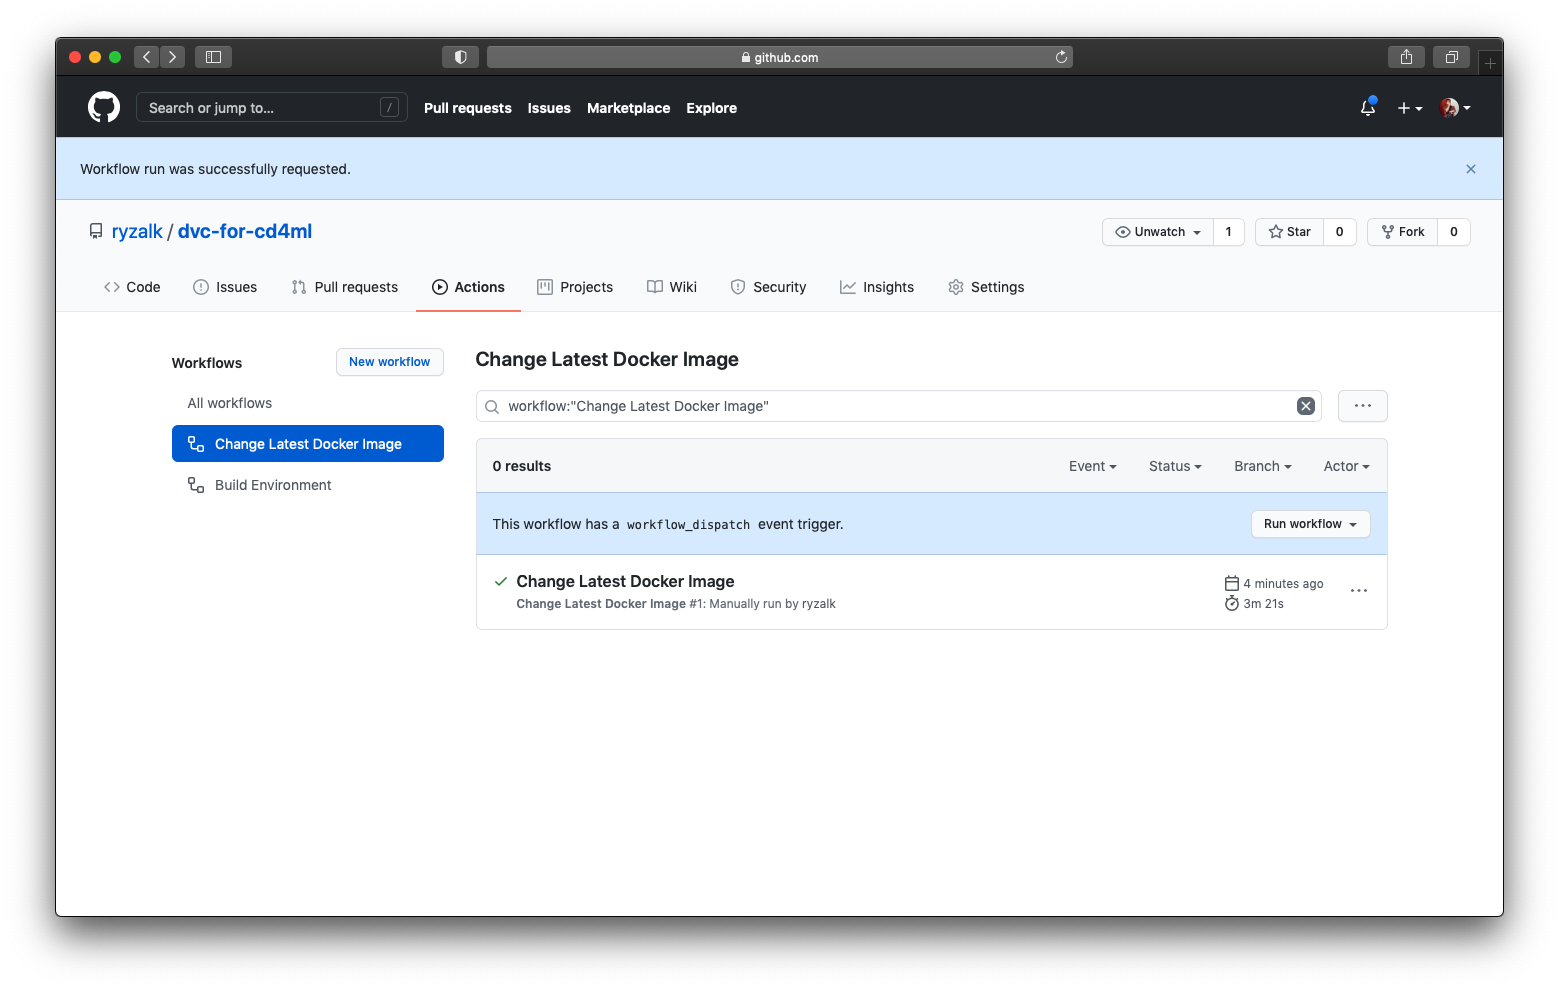
Triggering a Workflow Manually
In this subsection, we will be taking a look into how we can trigger a workflow on the ‘Actions’ tab through a button where an input can be provided as well. In order to have this feature be enabled, one would have to define a workflow_dispatch event in a workflow file (see explanation for .github/workflows/retag-docker-image.yaml).
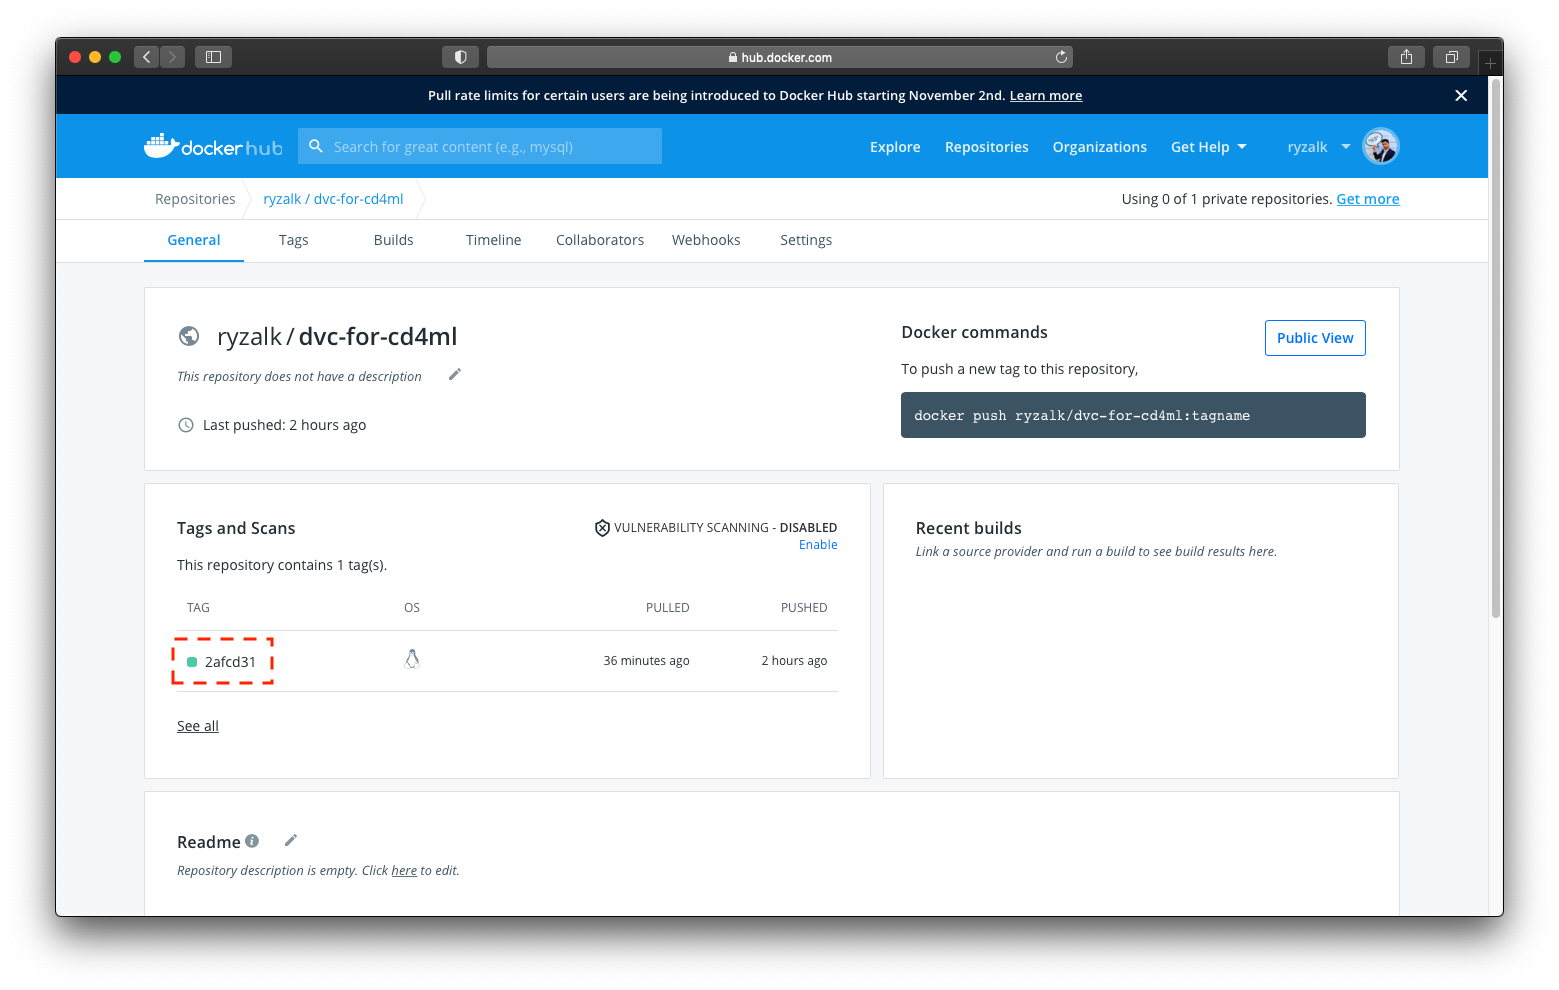
You would notice that the ‘dvc-for-cd4ml’ Docker image on Docker Hub is with a tag that is the same as the commit SHA indicated on the GitHub Action workflow run page (in this example it’s ‘2afcd31’). Taking note of this commit SHA/tag, head back to the GitHub repository’s ‘Action’ tab and inspect the Change Latest Docker Image workflow.
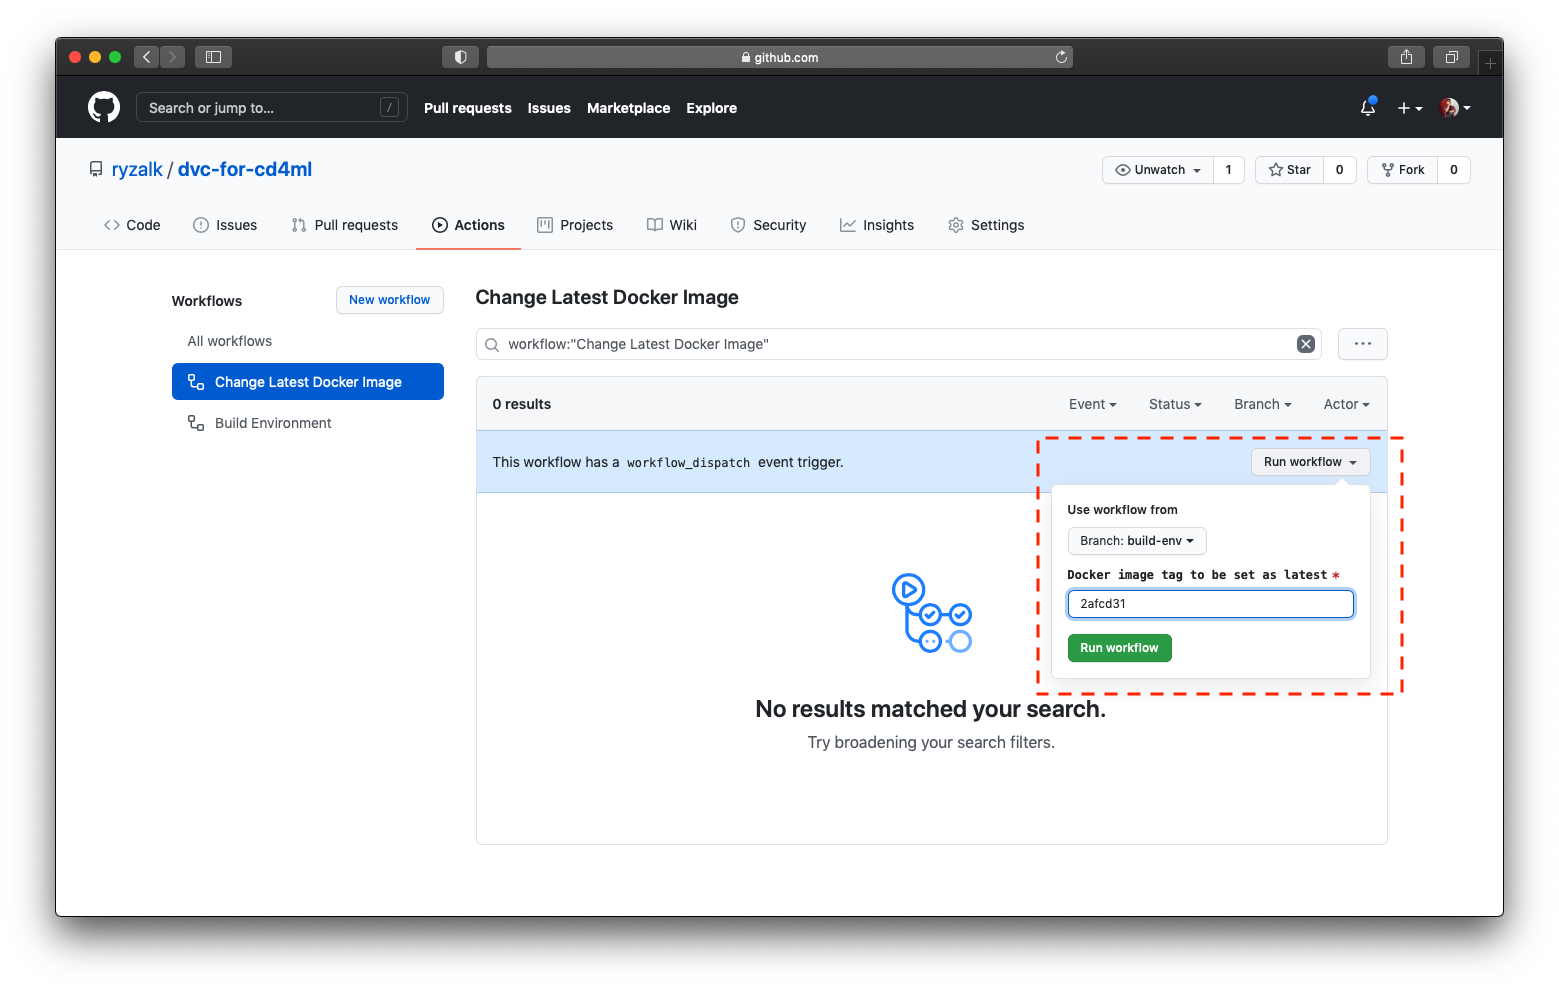
Change Latest Docker Image workflow on repository’s GitHub Actions tab.With reference to the dotted red box in the image above, click on the grey ‘Run workflow’ button. In the popup, paste the commit SHA obtained from the previous workflow into the value box and click on the green ‘Run workflow’ button. The workflow would run (initially accompanied with a circular orange icon) and after a few minutes, you should see a green check mark.
Change Latest Docker Image workflow successfully ran.Check back on the ‘dvc-for-cd4ml’ repository on Docker Hub and you will observe that this time, there exists another tag called 'latest'.
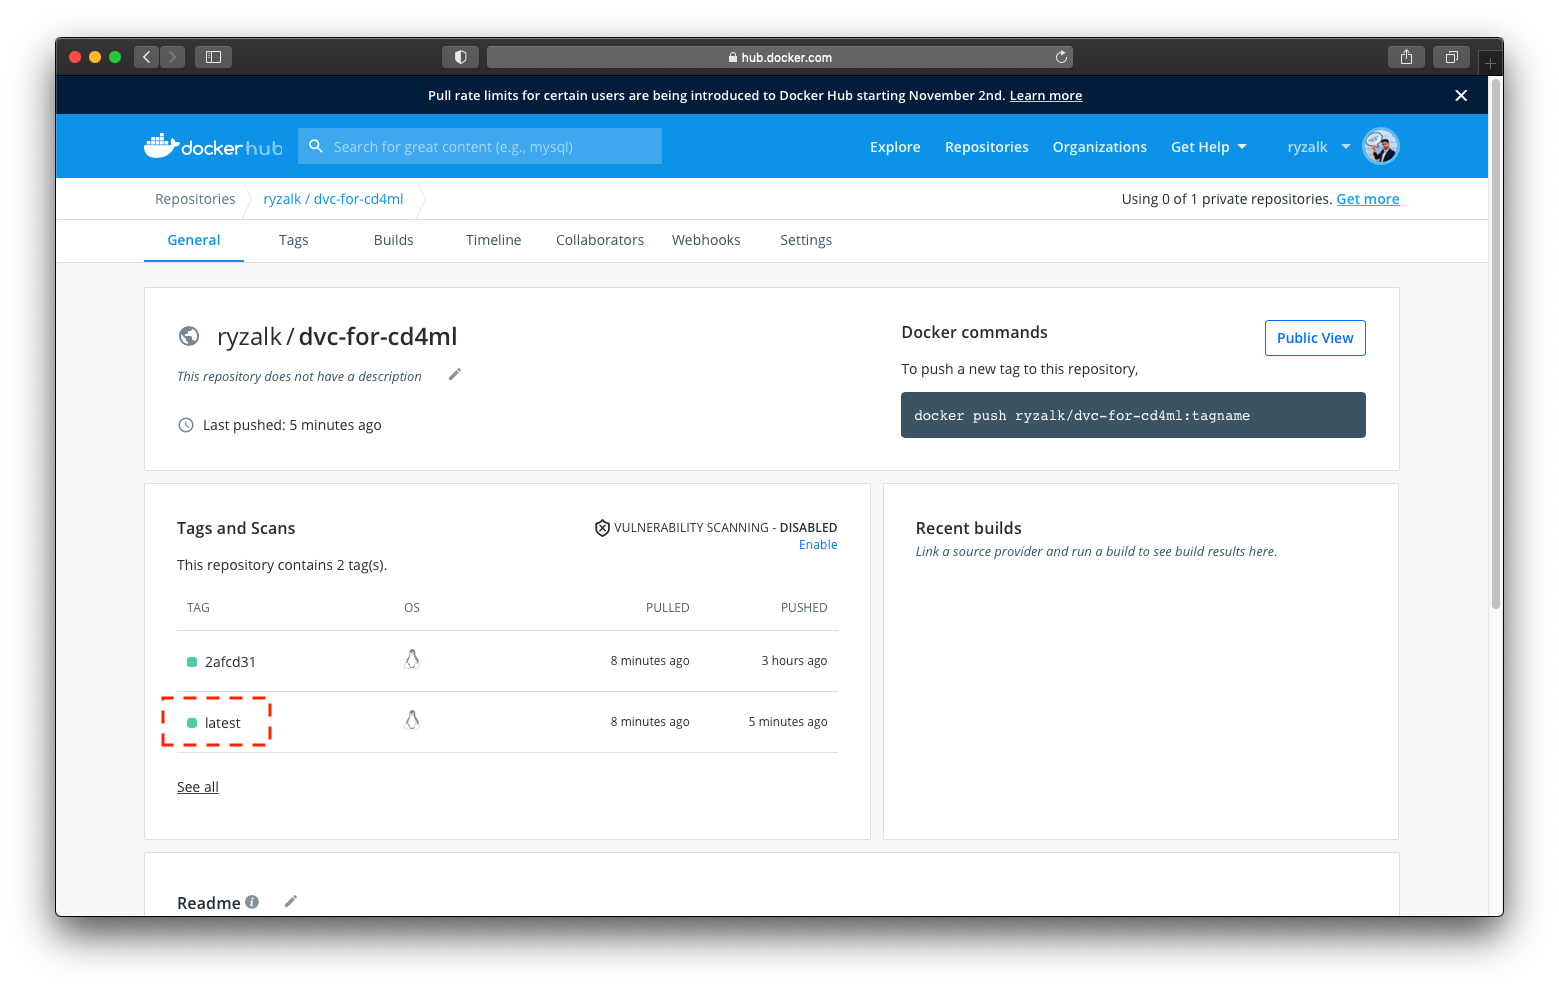
'latest' tag.Now that we have a Docker image with the 'latest' tag, we can use it for a workflow in the subsequent section.
Now one might wonder: why is this workflow manually triggered? One reason is that we might not prefer that every recent image that has been automatically built be tagged as 'latest'without further verification/testing. Exposing broken images to other workflows can cause bottlenecks and even a false sense of security. Verification that a Docker image with a specific tag is good to go can be done in one’s local machine or separate isolated workflows. Do note that this workflow that you are being exposed to might not be an optimal one but alas this is an introductory walkthrough.
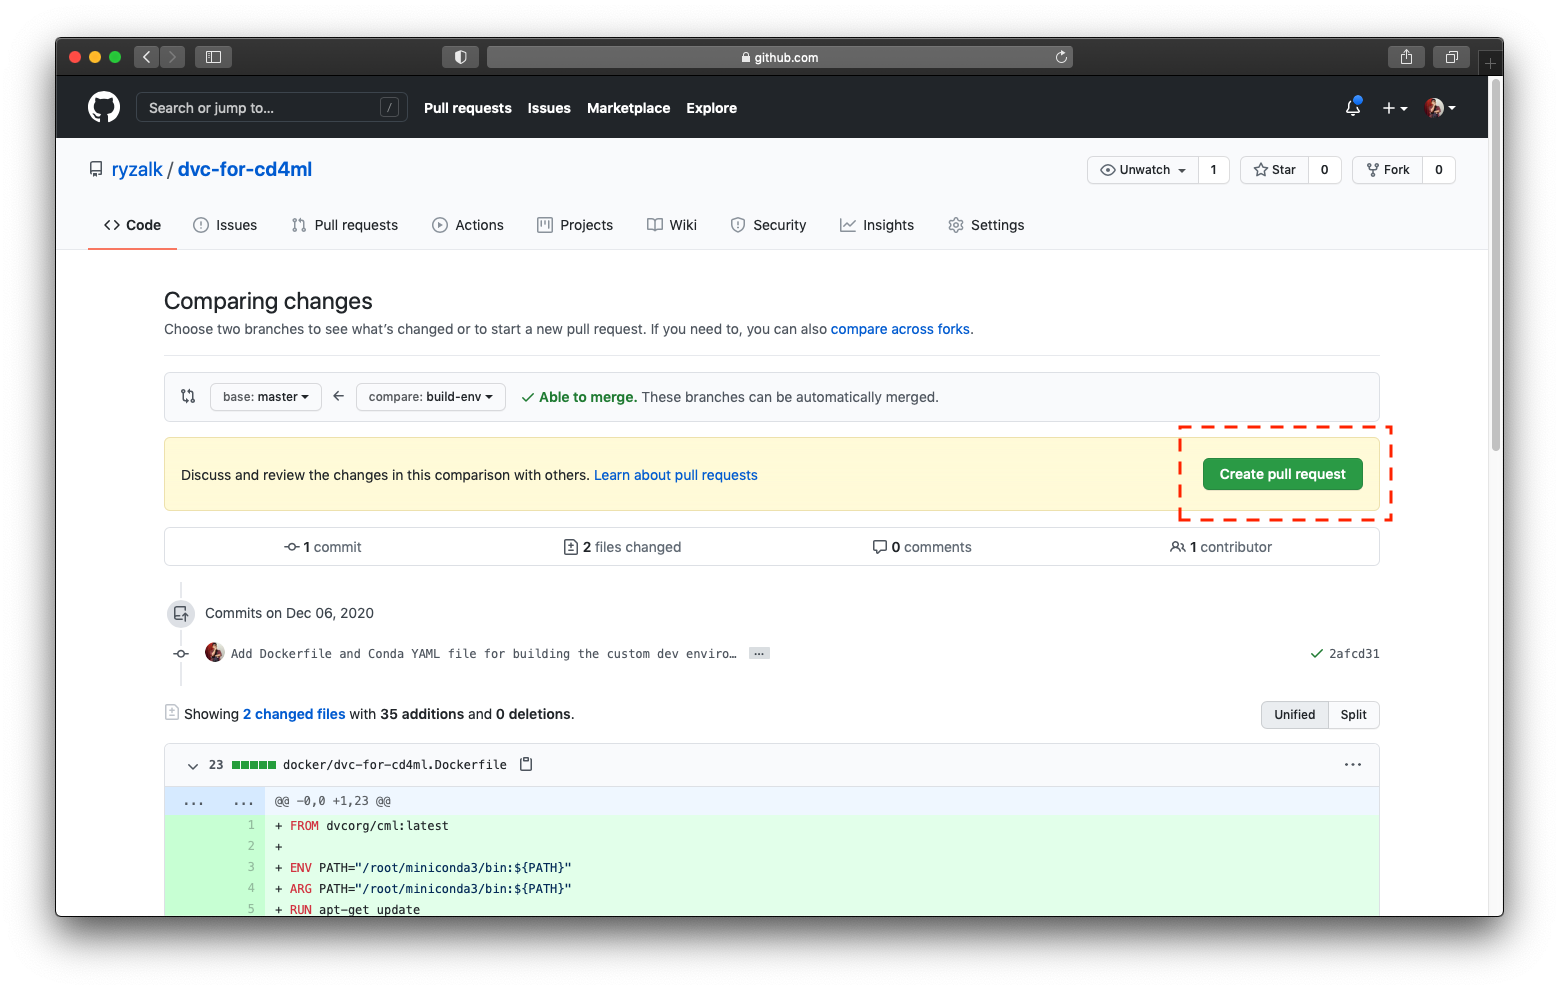
Before moving on to our next set of workflows, we would have to merge the build-env branch into the master branch. First navigate to the ‘Pull requests’ tab and then click on the green ‘New pull request’ button. Comparing the build-env branch with the master branch as the base, click on the green ‘Create pull request’ in the ‘Comparing changes’ page.
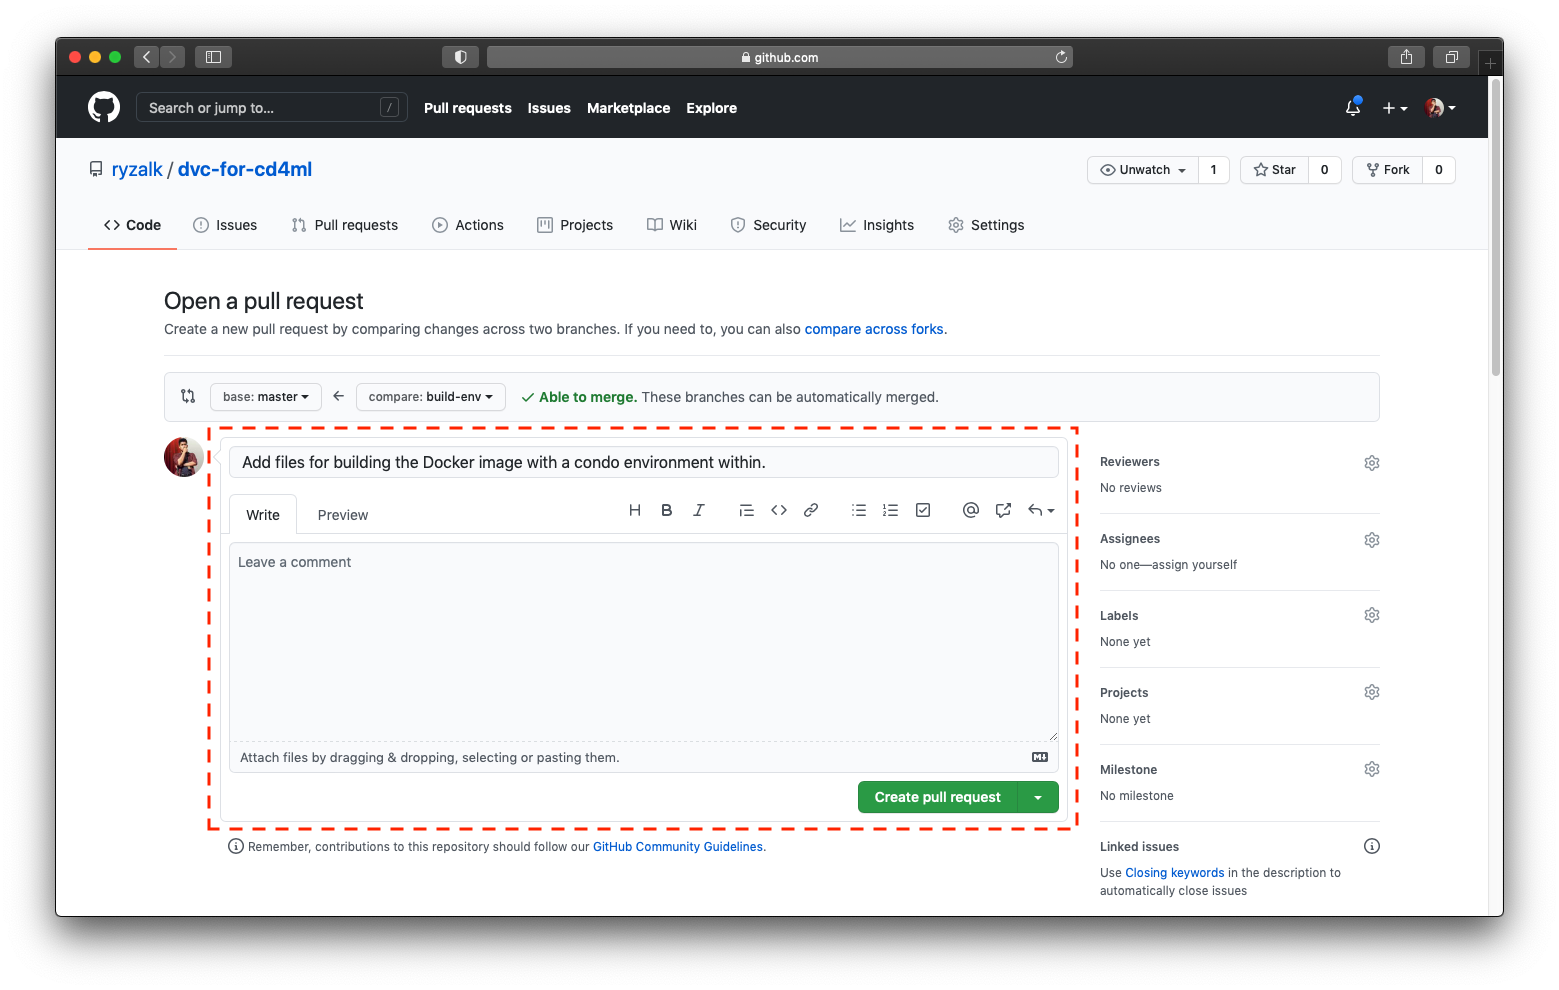
In the following page, you can give the pull request a customised name and leave a comment providing more details to the reviewer as to what the request entails.
A common use case for pull requests is for a developer to merge some work (a feature branch per se) that they have done into a ma branch (like master). This work is to be reviewed by authorised individual(s); the pull request would either be approved, the reviewer(s) would leave some comments for further revisions, rejected or ignored completely. The following page is what would be observed in a clean pull request where there are no conflicts and the changes can be merged:
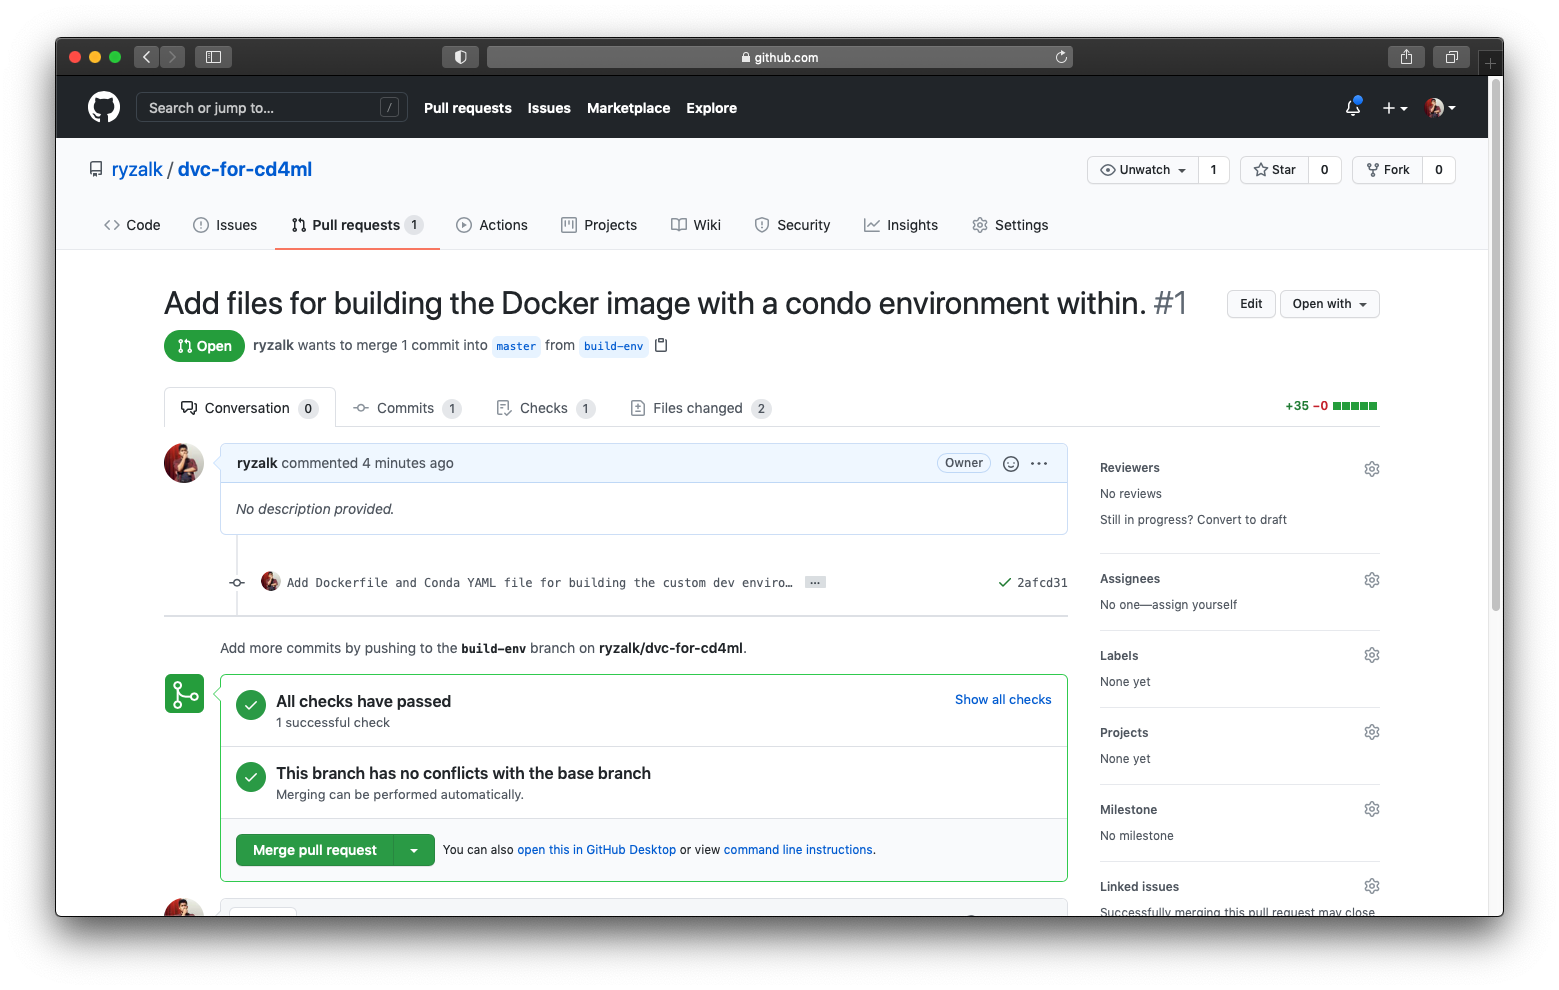
build-env ready to be merged into master.Oh, these wonderful green checks. Anyway, since you are the sole developer/reviewer of this repository, you can go ahead and click the button to merge the pull request and then confirm it. We will role play as a reviewer for this time round. (Also assuming the reviewer does not mind the typo ‘condo’ in the pull request title.)

build-env branch has been merged into master.You can see that once you’ve merged the branch, you have the option to delete that said branch. Since the changes in the build-env branch has been merged into master, it is okay to delete it. For now, we can just leave it; you can delete it later if you want. Now, on our local machine’s terminal, let us retrieve the changes merged into the remote master branch into our local master branch.
$ git checkout master
$ git pull origin master
Now, you have covered the complete workflow of making changes to the custom containerised development environment through automated builds. Let’s move on the next section where we do more with automated testing as well as versioning with DVC.
– Practical Section 2 –
Automated Testing & Versioning with DVC
The previous section focused on automated builds for containerised environments, providing some of you a first look into CI workflows. There was little work done on the local machine but we will see more of that in this section where data preparation and versioning of such pipelines are to be carried out. Also, there will be less hand-holding from this section onwards so we will move faster with less pinpointing.
First, let us create a Conda environment that will contain the libraries needed:
$ conda env create -f dvc-for-cd4ml-conda.yaml -n dvc-for-cd4ml
$ conda activate dvc-for-cd4ml
We also have to ensure that we have the following:
- DVC is intalled (within or out of the conda environment); check installation with the following command:
dvc version - A remote storage account all set up (in this walkthrough we will use Azure Blog Storage)
DVC with Remote Storage
Create a new branch for this section and push it to remote repository:
$ git checkout -b test-code-check-exp
$ git push -u origin test-code-check-exp
Now, we initialise this local repository as a DVC project:
$ dvc init
# The `.dvc` folder is automatically tracked by Git after initialisation
$ git commit -m "DVC init."
Set up a blob container on Azure storage (this example assumes a container named dvc-remote) and retrieve the connection string through the ‘Access keys’ tab on the left-hand panel.

Now, add the remote storage to our local DVC project:
$ dvc remote add -d azremote azure://dvc-remote/dvc-for-cd4ml
$ dvc remote modify --local azremote connection_string ''
IMPORTANT NOTE: Setting up remote storages for DVC differs between different providers. For more information on supported storage types and how to set them up for DVC, refer to this link.
Adding a remote storage for DVC would change the configuration file .dvc/config. This file is tracked so any user of the repository can gain access to these configurations. However, as shown above, any configuration meant to be used by DVC but to be obscured and not tracked by Git can be added with the --local flag. These untracked configurations can be found in the file .dvc/config.local instead. Let’s track the global DVC configuration.
$ git add .dvc/config
$ git commit -m "Add remote storage for DVC."
Adding & Versioning Raw Data
Remote storage for DVC has been configured and now we shall add the raw data. (This raw data is a subset of the Large Movie Review Dataset provided by the Association for Computational Linguistics.)
$ wget https://ryzalkdev.blob.core.windows.net/ryzal-pub-misc/dvc-for-cd4ml-resources/acl-imdb-movie-reviews.zip --directory-prefix=./data/raw/
$ unzip data/raw/acl-imdb-movie-reviews.zip -d data/raw
$ rm data/raw/acl-imdb-movie-reviews.zip
$ ls -la data/raw
# Output for raw data directory
$ tree data/raw -L 2
data/raw
└── acl-imdb-movie-reviews
    ├── test
    └── train
Here, we are going to track the subdirectory data/raw using the dvc add command. What this command basically does is track the data/raw folder, add it into the local DVC cache, creates a .dvc file (data/raw.dvc) and adds the subdirectory to a .gitignore file. The documentation for the command provides more details for what happens behind the scenes.
$ dvc add data/raw
$ git add data/raw.dvc data/.gitignore
$ git commit -m "Add raw data for DVC to track."
Now that the data has been tracked locally, we have to push it to the remote storage that acts as a long-term storage. Different versions of data pushed to such remote storages can be retrieved by individuals in a team. One might wonder: how does DVC know which version to pull in from the cache or remote storage? It is through the .dvc files which contains MD5 checksums for verifying the integrity of the data or artefacts in question. Again, DVC’s documentation for the relevancy and explanation of the .dvc files and directories will provide you with sufficient details.
$ dvc push data/raw.dvcAfter running the command above, you can check the Azure portal’s storage viewer and you would observe that in your blob container you would have a folder named 'dvc-for-cd4ml' containing many subdirectories. Let’s process the raw dataset now. Create and add the following files:
$ curl https://raw.githubusercontent.com/ryzalk/dvc-for-cd4ml/master/src/__init__.py --create-dirs -o src/__init__.py
$ curl https://raw.githubusercontent.com/ryzalk/dvc-for-cd4ml/master/src/data_prep.py --create-dirs -o src/data_prep.py
$ curl https://raw.githubusercontent.com/ryzalk/dvc-for-cd4ml/master/params.yaml --create-dirs -o params.yaml
$ git add src/__init__.py src/data_prep.py params.yaml
$ git commit -m "Add Python scripts for data preparation and config (params) file."
For more explanation on the files we have just tracked and committed, click on the expandable sections below:
- src/__init__.py
Click here for a detailed rundown of the file.
- src/data_prep.py
Refer to the docstrings contained within each function for further explanation.
- params.yaml
Click here for a detailed rundown of the file.
DVC Pipelines
In the following step, we will be executing the script to process each of the text file in the directory data/raw/acl-imdb-movie-reviews. However, rather than just a simple execution through python data_prep.py, we will make use of the dvc run command instead.
# Making sure that the conda environment has been activated
$ conda activate dvc-for-cd4ml
$ dvc run -n data_prep
    -d src/data_prep.py -d data/raw
    -o data/processed
    python src/data_prep.py
Using this method would automatically add and track the dependencies and outputs of a stage that is to defined by the user. When this repository is eventually cloned and other developers intend to reproduce the pipelines, they can just execute the dvc repro command which checks for the dependencies’ integrity. Should the dependencies deviate, dvc repro will rerun the pipeline(s) and the new outputs resulting from the differed dependencies would be tracked. In the example above, the data/raw folder (as well as the data preparation script itself) is added as a dependency for the data_prep stage. The output of the data_prep stage is the data/processed folder. However, this time, we didn’t use the dvc add command like with the raw data. The reason for this is because as mentioned, dependencies and outputs defined in dvc run pipelines are automatically tracked (not pushed though, do note the difference). However, you would notice the creation of two new files: dvc.yaml and dvc.lock. Summarising the utility of these files: dvc.yaml keeps track of pipeline stages defined by the user and dvc.lock contains the MD5 checksums relating to the dependencies and outputs of the defined pipelines. These DVC files are to be versioned by Git so that we can checkout differing versions of pipelines, data, or other artefacts.
$ git add data/.gitignore dvc.yaml dvc.lock
$ git commit -m "Add and execute data preparation pipeline to/through DVC."
For greater details on the files generated by DVC (like dvc.yaml and dvc.lock), please refer to DVC’s documentation here. I can’t recommend DVC’s documentation enough; it’s great.
Don’t forget to push the tracked data and artefacts related to the data_prep stage to the remote storage.
$ dvc push data_prepAdding & Automating Unit Tests
So we have created a script for processing the raw data. That is nice. What would be even more nice if we are to introduce some unit tests to ensure that the functions we have written for the data processing pipeline would always work as intended, especially after changes would be incorporated by fellow developers. What we are working towards is a workflow for which code changes are tested following pull requests. The tests will be automatically invoked and the results will be made visible to reviewer(s). If one sees red, that means tests have failed and this warrants further changes to the branch, until more green check marks could be seen. In addition to unit tests, we will also conduct checks for code quality through linting. Checks and validations introduced through unit tests are more explicit. Linting is more wholistic in the sense that it checks for potential bugs, bad coding conventions and stylistic errors. We will be using the Python libraries pytest and pylint for unit testing and linting respectively.
Let’s add such unit tests to our repository by creating and committing the following files:
$ curl https://raw.githubusercontent.com/ryzalk/dvc-for-cd4ml/master/tests/__init__.py --create-dirs -o tests/__init__.py
$ curl https://raw.githubusercontent.com/ryzalk/dvc-for-cd4ml/master/tests/test_data_prep.py --create-dirs -o tests/test_data_prep.py
$ curl https://raw.githubusercontent.com/ryzalk/dvc-for-cd4ml/master/.pylintrc --create-dirs -o .pylintrc
$ git add tests/__init__.py tests/test_data_prep.py .pylintrc
$ git commit -m "Add unit tests and linter configuration."
For more explanation on the files we have just tracked and committed, click on the expandable sections below:
- tests/test_data_prep.py
Click here for a detailed rundown of the file.
- .pylintrc
Click here for a detailed rundown of the file.
We can try out the unit tests and linting capabilities locally using the following commands:
$ pytest tests --cov=src
$ pylint --fail-under=8.0 src
Running the commands above will yield outputs detailing the results. The unit tests’ results usually detail the number of passes, fails and warnings. The linter would showcase a score, in this case, out of 10. Depending on the standards i.e. score that your team intends to uphold, the linter can output a binary result. In the example above, the score 8.0 is specified and so if any code passes through it and does not meet the mark, the command will exit with an error.
Now, we add a GitHub Action workflow which runs the aforementioned tests and checks every time a pull request is made to the master branch:
$ curl https://raw.githubusercontent.com/ryzalk/dvc-for-cd4ml/master/.github/workflows/test-analyse-code.yaml --create-dirs -o .github/workflows/test-analyse-code.yamlIMPORTANT NOTE: The Docker image stated in the workflow file above has the user prefix ryzalk. Before adding and tracking the file, modify it such that your Docker Hub username is used instead. At the time of writing, there’s no way to pass on the Docker Hub username for the container image definition.
$ git add .github/workflows/test-analyse-code.yaml
$ git commit -m "Add GitHub Action workflow for running unit tests and linter."
$ git push origin test-code-check-exp
For more explanation on this workflow, click on the expandable section below:
Click here for a detailed rundown of the file.
Now, create a pull request comparing the test-code-check-exp branch with master and what you would observe is that instead of a single GitHub Action workflow being accounted for, you would see another one called ‘Test & Analyse Code’ running, and the end result would look something like the screenshot below:

Rejoice! However, DO NOT MERGE this pull request just yet. We are going to push more commits to this branch in the next section which are going to be reflected in this same pull request. So with the tests and checks configured above, we can mitigate any possible degradation of the code base and check that conventions and standards are well-adhered to. Let’s move on to model experimentation and training.
– Practical Section 3 –
Reviewing Model Experiments
With the processed set of data, we can now train a model that is able to take in a text and conduct binary sentiment classification (positive VS negative). We will be using the Keras framework for training the model. As mentioned previously, the script for training the model is derived from this tutorial.
Experiment Tracking
Before we train the model, make sure that your Weights & Biases (W&B) account has been set up. With the API key retrieved from ‘Settings’, you can log in to W&B through the following command:
$ wandb login You can also execute the following to save you the task of logging in to W&B beforehand:
$ export WANDB_API_KEY=Let’s create and commit the model training script linked below:
$ curl https://raw.githubusercontent.com/ryzalk/dvc-for-cd4ml/master/src/train.py --create-dirs -o src/train.py
$ git add src/train.py
$ git commit -m "Add model training script."
(Refer to the docstrings contained within each function in the script for further explanation.)
Like with the pipeline for processing the raw data, we are to create and track the pipeline for training the model through DVC:
$ dvc run -n train_model
-d data/processed -d src/train.py
-o models/text-classification-model -o train-run-metrics.md
-p train.epochs,train.bs,train.metric,train.pretrained_embedding
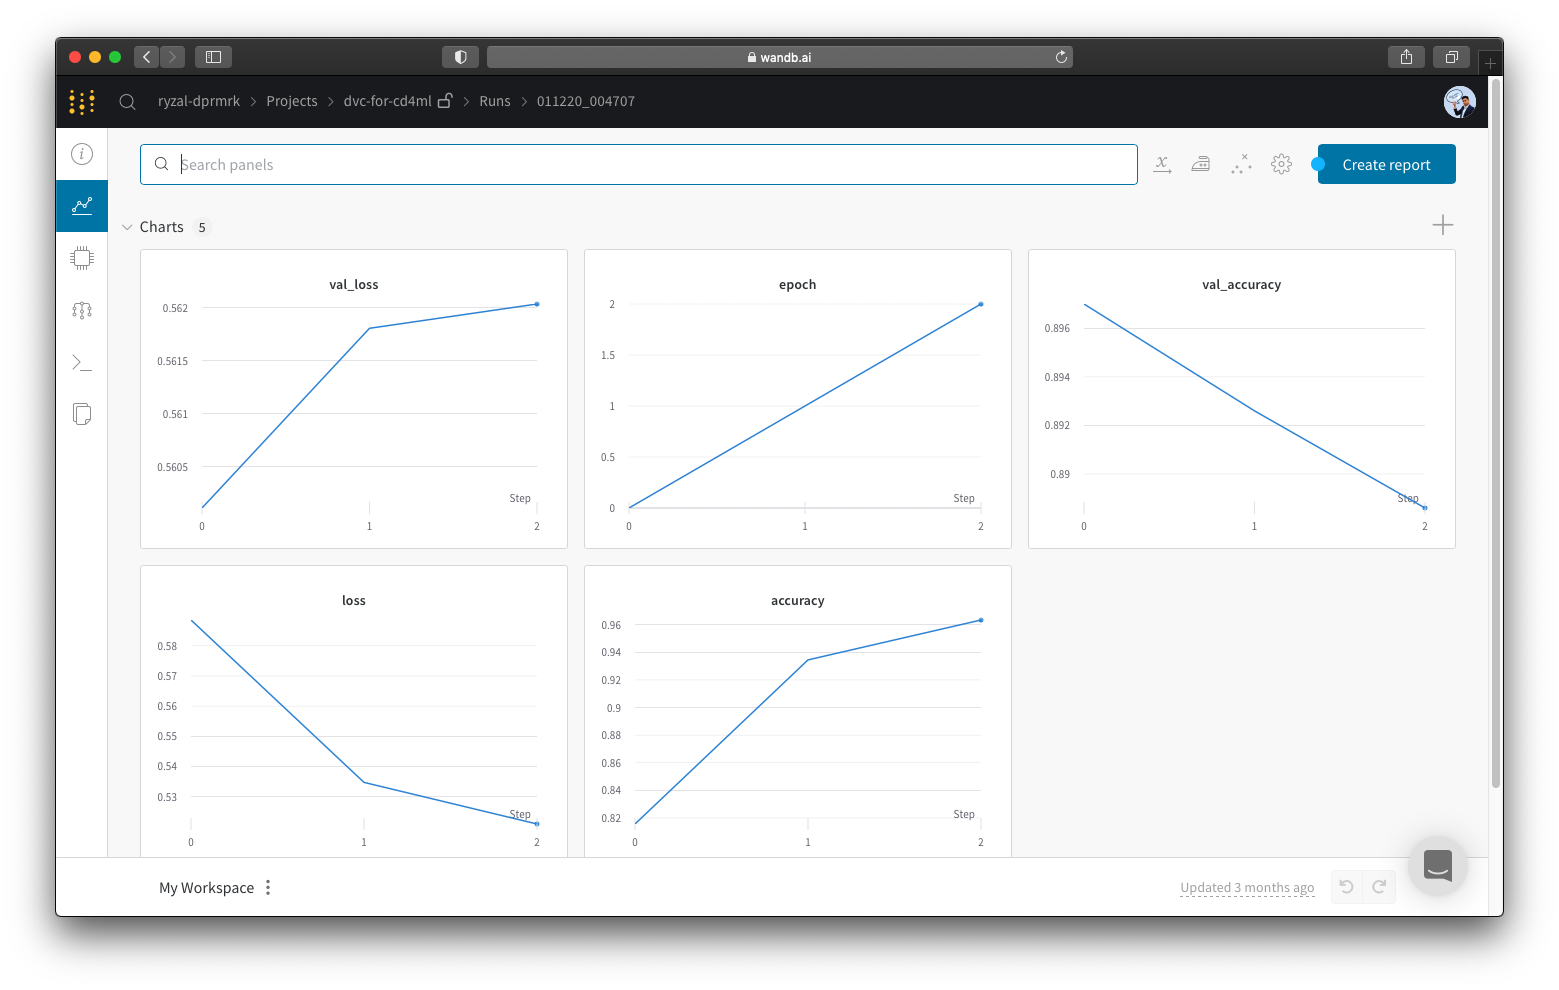
python src/train.pyIf your model training is without a GPU in the picture, it would take some time. In the meantime, let’s go through the execution. As seen from above, the dependencies for the train_model stage are the processed data (data/processed) and the training script itself (src/train.py), while the outputs are the resulting model (models/text-classification-model) and a Markdown file (train-run-metrics.md) which contains the following information:
- ‘Link to run’ – A link that directs one to the experiment run page on the W&B portal/dashboard. A screenshot of an experiment run page can be found below.
- ‘Model loss’ – A float value that indicates the resulting test loss of the model that was trained.
- ‘Model accuracy’ – A float value that indicates the accuracy metric of the model that was trained.
What is different from the previous time round where we have created a DVC pipeline stage is that we use the -p flag here. Usage of this flag allows us to also track the different parameters defined in the file params.yaml which we intend to modify from time to time between different experiments. In this example, we intend to keep track of the parameters (keys) epochs, bs, metric, and pretrained_embedding. See DVC’s documentation on params here.
$ git add models/.gitignore .gitignore dvc.yaml dvc.lock
$ git commit -m "Add a DVC pipeline stage for training the binary sentiment classification model."
$ git tag -a "model-v1.0" -m "First version of text classification model."
$ dvc push train_model
With the commands above, we add the updated DVC files (dvc.yaml and dvc.lock) as well as the newly created .gitignore files which tells Git to ignore the outputs of the train_model stage. Of course, we are to push these tracked artefacts to the remote storage with dvc push again. We also provide the latest commit with a Git tag. The utility of this tag is that we can easily checkout a specific commit/reference with it. With the provided “model-v1.0” tag above, we can just execute git checkout model-v1.0 in the future to get back to this state, without having to scramble for the exact commit SHA of that specific commit/reference. Tags are also useful for indicating releases. We will make use of this tag later on.
Reviewing Model Experiments Through Comments
Now, we are to create another GitHub Action workflow which allows us to post a comment in the pull request. The contents of this comment will be derived from the Markdown file (train-run-metrics.md) generated by the training script. Recall that this file is an output of the train_model stage tracked by DVC. We create and commit the following file:
$ curl https://raw.githubusercontent.com/ryzalk/dvc-for-cd4ml/master/.github/workflows/comment-pull-req.yaml --create-dirs -o .github/workflows/comment-pull-req.yamlIMPORTANT NOTE: The Docker image stated in the workflow file above has the user prefix ryzalk. Before adding and tracking the file, modify it such that your Docker Hub username is used instead. At the time of writing, there’s no way to pass on the Docker Hub username for the container image definition.
$ git add .github/workflows/comment-pull-req.yaml
$ git commit -m "Add GitHub action workflow for displaying model training experiment results. Trigger: comment-model-exp"
More explanation for the workflow file can be found in the collapsible section below:
- .github/workflows/comment-pull-req.yaml
Click here for a detailed rundown of the file.
You may notice that the commit message for adding this new workflow contains a keyword: comment-model-exp. This is a custom keyword configured to trigger the act of commenting on the pull request with the Markdown file through the defined GitHub Action workflow. However, remember that the Markdown file (train-run-metrics.md) is tracked by DVC which means that it is not ‘uploaded’ to Git but instead to DVC’s remote storage. The runner spun up for GitHub Actions would therefore require access to the remote storage so we need to add the Azure connection string as a GitHub secret; name it AZ_CONN_STRING.

$ git push origin test-code-check-exp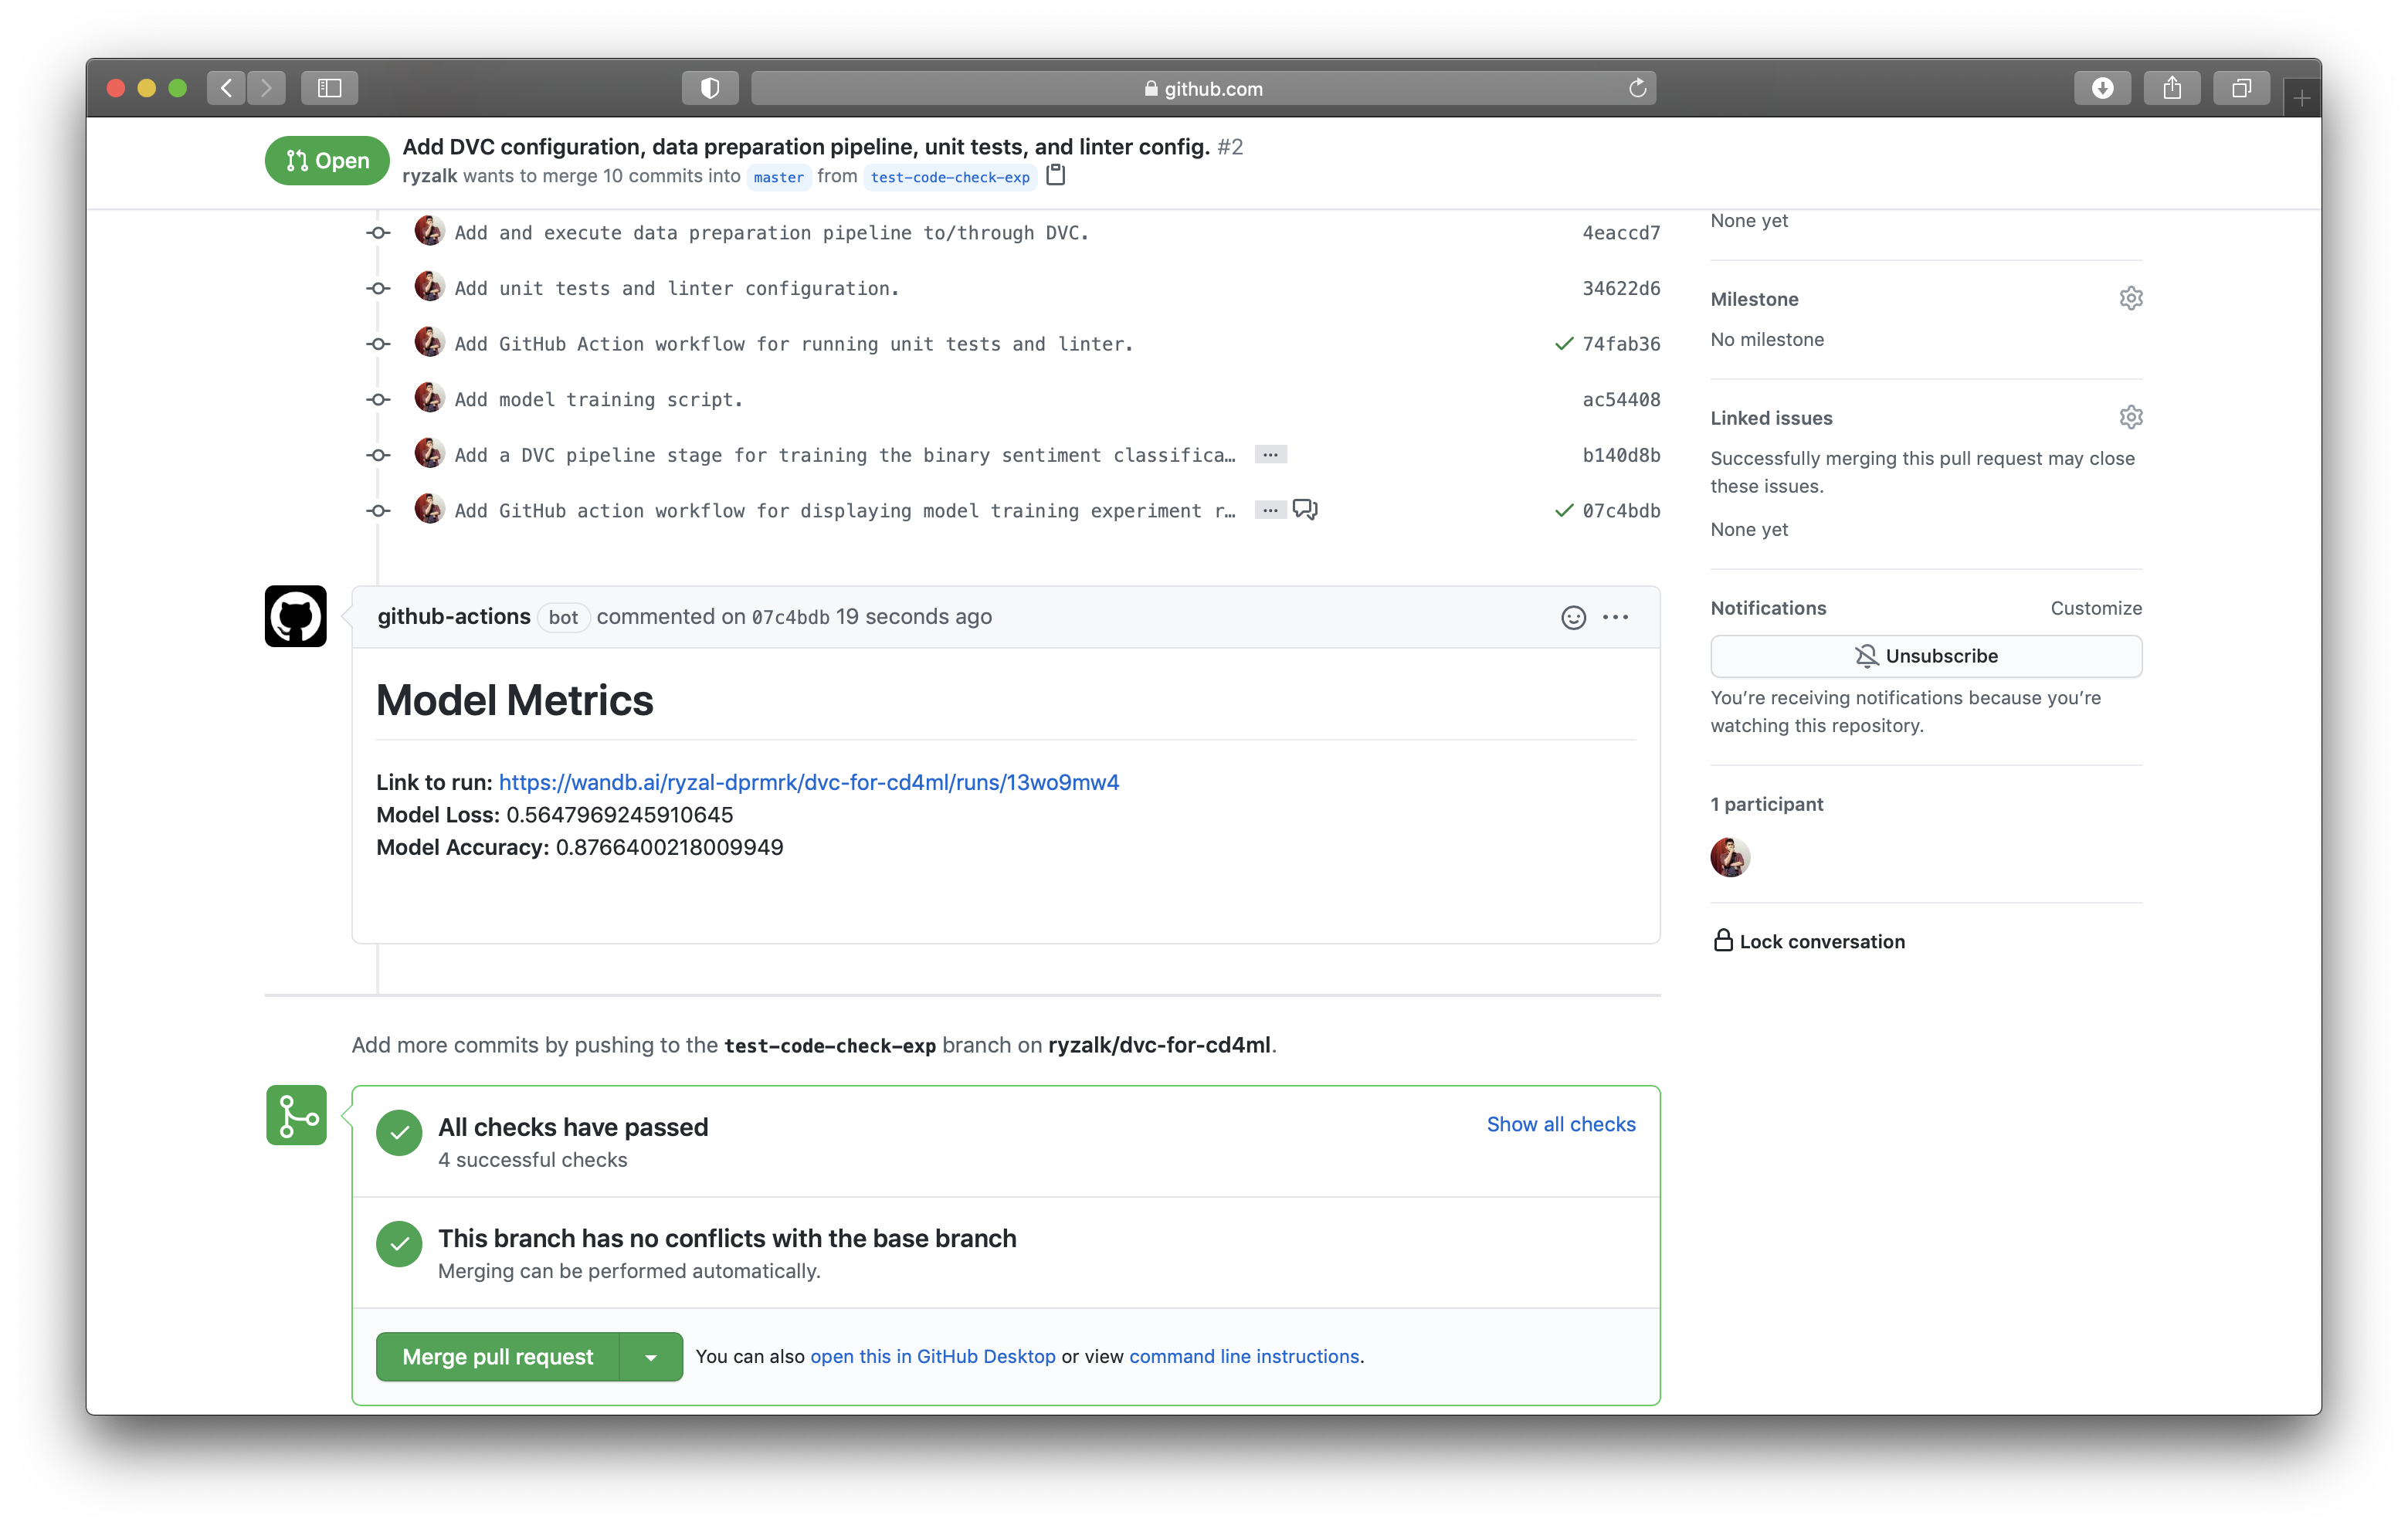
As observed above, a comment containing information from the Markdown file has been posted. So what’s the use or relevance of this? Well, for one, such comments can quickly initiate discussions on a model training experiment, with relevant information at disposal. As this job of posting a comment is only triggered by a keyword in the commit message, this means that such discussions are selectively invoked. Let’s just assume that the reviewer in our scenario is satisfied with the model; we can merge the pull request.
Reproducing The Model Training Pipeline
Remember the dvc repro command from above? We are going to use it for this section; let’s pretend that we have a fellow engineer working on this same project and they have to run the same model training pipeline, just with a different parameter value. To begin this ‘simulation’, navigate to another directory that does not have this ‘dvc-for-cd4ml’ repository and clone the repo:
$ git clone https://github.com//dvc-for-cd4ml.git
$ cd dvc-for-cd4ml
Create a new branch improve-model:
$ git checkout -b improve-model
$ git push -u origin improve-model
From this new branch, we are to run another model experiment. However, before we are able to train the model, we need the processed data to be provided as inputs to this pipeline. The remote storage set up for DVC allows for us to easily retrieve the processed data without having to run the data_prep stage again. Remember, we are treating repository we have just cloned as though it is located in another machine. So, we have to configure the connection string for DVC to connect to the remote storage:
$ dvc remote modify --local azremote connection_string '' After adding the necessary configuration above, we pull the artefacts pertaining to the relevant pipeline stages (data_prep and train_model) from the remote storage:
$ dvc pull data_prep train_modelNow recall that the model training pipeline stage train_model is tracked by DVC, and the repository has a dvc.yaml file that retains the definition of the stage. We do not have to run the multiline dvc run command again. With dvc repro, DVC will check for any deviations in the dependencies or parameters set for the targeted pipeline stage. Should that be the case, DVC will run the pipeline again, taking into account those deviations. Let’s try out the dvc repro command here:
# Make sure that the relevant conda environment has been activated
$ conda activate dvc-for-cd4ml
$ dvc repro --downstream train_model
Stage 'train_model' didn't change, skipping
Data and pipelines are up to date.
The resulting output tells us that since no tracked dependencies or parameters of the train_model stage has deviated, we can just make do with the artefacts that currently exist and the train_model stage can be skipped. The --downstream flag is for indicating which stage that dvc repro should start from. The example above simply means that we are to reproduce pipelines starting from train_model onwards. Without the flag, DVC will check through every stage, which might not be ideal or too time consuming. Now, let’s create a deviation. Change the value for the epoch parameter in the params.yaml file and now rerun the same dvc repro command:
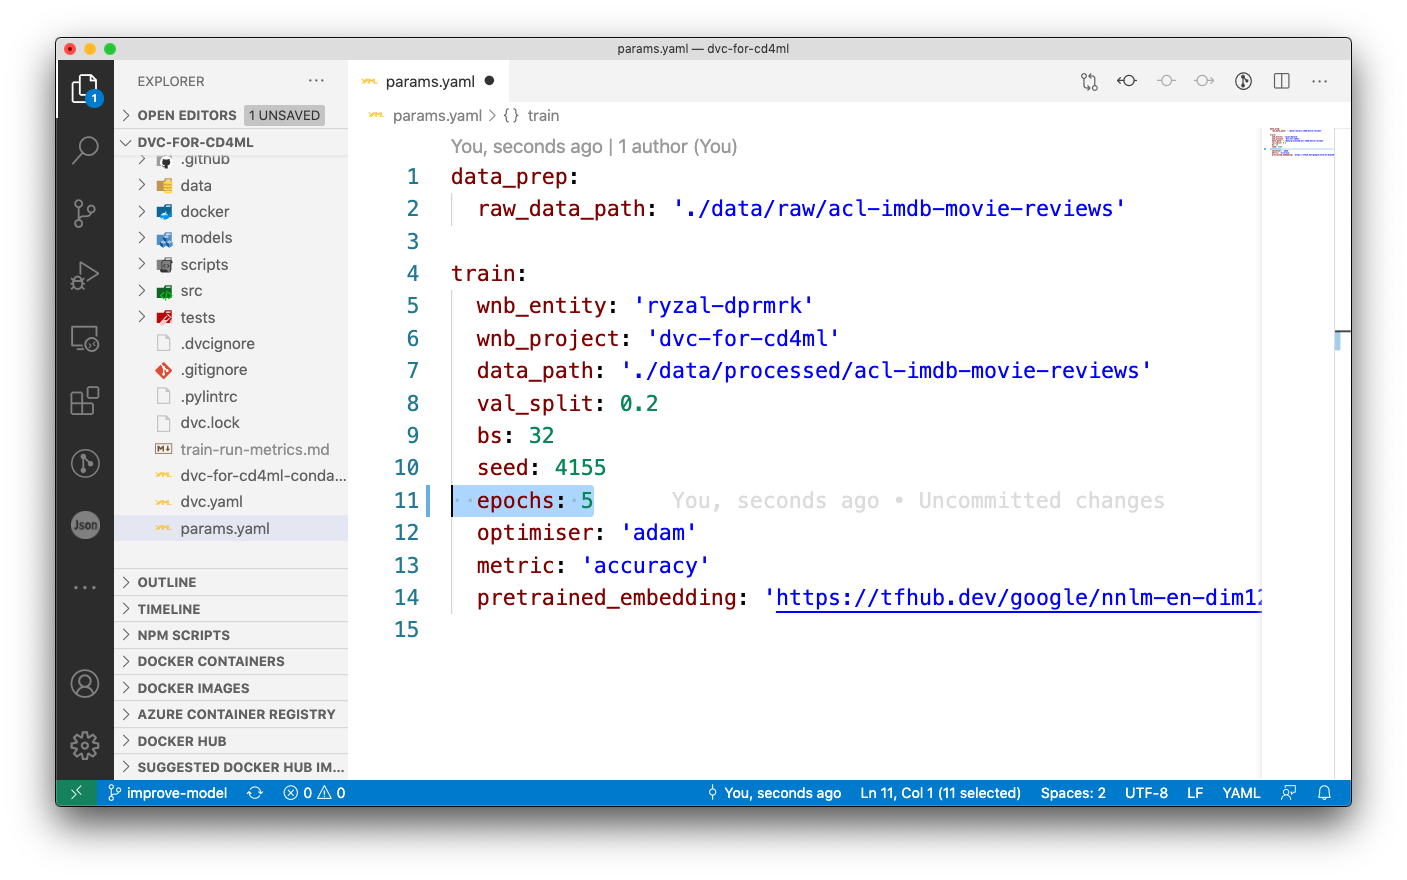
$ dvc repro --downstream train_model
Running stage 'train_model' with command:
	python src/train.py
...
After the training is done, the dvc.lock file will be modified, containing the updated MD5 checksums. We have to track and commit the files that have been modified, and provide the commit with a tag providing some indication that it contains the files relevant for this new model version. Don’t forget to push the relevant artefacts to the remote storage!
$ git add dvc.lock params.yaml
$ git commit -m "Train second version of sentiment classification model (5 epochs). Trigger: comment-model-exp"
$ git tag -a "model-v2.0" -m "Second version of text classification model."
$ git push origin improve-model
$ dvc push train_model
Create a pull request comparing the improve-model branch with master. A comment containing details for the newly trained model will be posted once the triggered workflow has finished running. The pull request can be merged after. Within this same local repository, check out the master branch and pull in all the changes.
$ git checkout master
$ git pull origin master
So in this master branch, for which DVC has been configured, we have two different versions of the binary sentiment classification tracked. Say we want to like to retrieve the first version of the model, (perhaps for a reason that it has better accuracy) how do we do that? Well, that’s where the utility of the dvc.lock file comes in. We retrieve the version of the dvc.lock file that belongs to the tag detailing the first version of the model ('model-v1.0') and we have dvc checkout to retrieve that version of the mode.
$ git tag
...
model-v1.0
model-v2.0
$ git checkout model-v1.0 -- dvc.lock
$ dvc checkout train_model
...
M       models/text-classification-model/
M	train-run-metrics.md
The resulting output from the last command above shows that the artefacts contained in the folder models/text-classification-model/ and the file train-run-metrics.md have been modified, reflecting the version from the tag 'model-v1.0'. From here, we can see how easy it is for us to toggle between the different versions of the models and other relevant artefacts. With the Markdown file/artefact, we can make use of the link embedded within it to extract more information for the model experiment.
– Practical Section 4 (Optional) –
Packaging & Serving
So we know how to toggle between different versions of trained models. However, these models won’t be of much use unless we package them for end-users to request for predictions from it. In this section, we will create a simple Flask app that loads a trained model and have it serve predictions/responses (positive VS negative sentiment) upon requests by end-users. At the end, we package this app into a Docker container and we test it out, all on our local machine. With that said, this requires Docker to be installed on your machine. Let’s create and add the following files:
$ curl https://raw.githubusercontent.com/ryzalk/dvc-for-cd4ml/master/src/serve_model.py --create-dirs -o src/serve_model.py
$ curl https://raw.githubusercontent.com/ryzalk/dvc-for-cd4ml/master/docker/dfc-model-flask-server.Dockerfile --create-dirs -o docker/dfc-model-flask-server.Dockerfile
$ curl https://raw.githubusercontent.com/ryzalk/dvc-for-cd4ml/master/.dockerignore --create-dirs -o .dockerignore- src/serve_model.py
This script contains the code for the Flask application that loads up the trained model (located under models/text-classification-model) and returns a prediction indicating whether the submitted text is of a positive or negative sentiment.
- dfc-model-flask-server.Dockerfile
This Dockerfile contains the commands for building the Docker image for serving the model. This Docker image will have the relevant Conda environment installed and the trained model within it. Basically, this image packages all that is relevant for us to conduct binary sentiment classification.
- .dockerignore
When building a Docker image from a folder, that folder will be regarded as a context for the Docker engine. If you regard a whole folder as a context, the whole folder will be sent as a context to the Docker daemon so if your folder is huge, which in this context it definitely is, a lot of time will be consumed before the layer building even starts. Therefore, this file would be crucial for specifying the context needed for our Docker build workflows. Do not ignore .dockerignore.
Build the Docker image.
$ docker build . -t dfc-model-flask-server:model-v1.0 -f ./docker/dfc-model-flask-server.DockerfileAfter the build is done, run a container from the image has been built. We bind the port 80 from the container to the port 80 on the host machine. We also name the container 'dfc-serving'.
$ docker run -d -p 80:80 --name dfc-serving dfc-model-flask-server:model-v1.0To make a POST request to the Flask app, you can use the curl command to specify the endpoint, header and data to be sent, as such:
$ curl -X POST "localhost/predict" -H "Content-Type: application/json" -d '{"text": "This movie was unpleasant, like the year 2020."}'
{"sentiment":"negative"}
To stop the container:
$ docker stop dfc-servingDon’t forget to track and push these files.
# To get rid of changes to the dvc.lock file
$ git checkout master -- dvc.lock
$ git add .dockerignore docker/dfc-model-flask-server.Dockerfile src/serve_model.py
$ git commit -m "Add Python script and Dockerfile for model serving."
$ git push origin master
What you can do with this Docker image is to easily share it with your colleagues for them to test out the inference server (Flask app) and perhaps even deploy it in a proof-of-concept/staging environment.
IMPORTANT NOTE: This Docker image is not suitable for a production environment. You would need a production server (like a WSGI server) for matters like handling of multiple requests or asynchronous compute. Deployment of the prediction app in a production-ready environment is out of this walkthrough’s scope.
Next Steps
This walkthrough brings one through a deeper dive into the different CD4ML concepts but it scratches the surface. There are plenty of improvements that can be introduced to the workflows that have been introduced. Here are some examples:
- Automated workflows for invoking model training, perhaps in self-hosted runners with GPU
- Usage of DVC with a shared development server for quick retrieval of artefacts from cache (as opposed to remote storages)
- Automatic deployment of packaged application (Continuous Deployment)
- Caching of dependencies to speed up workflows
- Hardening of Docker images
While this walkthrough has greater emphasis with the usage of DVC and GitHub Actions, the concepts we have come across are definitely applicable to other alternative tools; there are many different pathways to achieving the same objectives so have all the fun with exploring them!
